Admin EDIT: Check out the installation video here: https://www.youtube.com/watch?v=a_yJqSot-Hc
Hi Forum. I want to present here something I have been working on in the past few weeks which I think many might find useful. It’s basically a full rewrite of the VanPi OS which aims at better extensibility / compatibility and which introduces some native features including GPS, Zigbee2MQTT, multiple batteries, better USB support etc.
A lot of this post will be about rather technical stuff that might not be so interesting to everyone out there, but I also listed a few of the advantages of the work I’ve done so far from the perspective of an end user, so feel free to scroll down if you don’t care about the “how”.
PS: Sorry for writing in English, but my German is not so good and I anyway believe English is better suited for discussing relatively technical topics.
Disclaimer
Everything I’m presenting here today is largely work-in-progress. It’s a pre-alpha version at best. Support is already decent - albeit with some notable missing components (Heater, Shunt and tank sensors) - but the UI around it is certainly not ready for being used in any of your real-life builds.
Additionally: as much as I tried providing “some” documentation already, its state reflects the very young nature of the project. A lot can be improved or is missing entirely.
Background and motivation
Since I plan on building fairly complex stuff in my van (e.g. a recirculating shower, multiple inverters, remote video surveillance etc.), I have a fairly good idea of what my needs are and I know that many of them are not directly supported by the current VanPi software (and for good reason).
I started tinkering with the VanPi OS last month for a few days and I eventually realized that extending the current Node-Red application was going to be messy. I found there is a lot of unnecessary repetition in the code and that the current stack, being installed directly on the Pi, requires a lot of dependencies that bind the OS to outdated libraries and softwares (Debian Buster and such). As I mentioned on some other thread last month, I would much rather work with a docker-based stack which is easy to extend and which deploys focused services that are also portable.
Another thing I was frustrated with, as someone who wanted to develop the system further, was the lack of a version-controlled development workflow (i.e. Git-based). I definitely did not want to implement major extensions of flows and have to copy-paste changes around Node-Red any time an update would occur.
Furthermore, the current stack operates as a monolith, which by definition poses significant challenges (increased complexity, hard to maintain, scale, and adapt). I believe the only concern of the “core” VanPi OS should be controlling the VanPi hardware. Everything else (primarily UI and automation) should probably live somewhere else. In other words, I think the current software does not score well with regards to a sane separation of concerns.
So, long story short, I decided rewriting a brand new stack would be the easiest way forward for me, personally. After a few weeks of working on it in my spare time, I think it’s reached a point where I would present it here and start getting some feedback.
Technical design
Here is a rundown of the main components of “my version” of the VanPi software.
1. Docker-based architecture
GitHub project: GitHub - coconup/nomadpi · GitHub
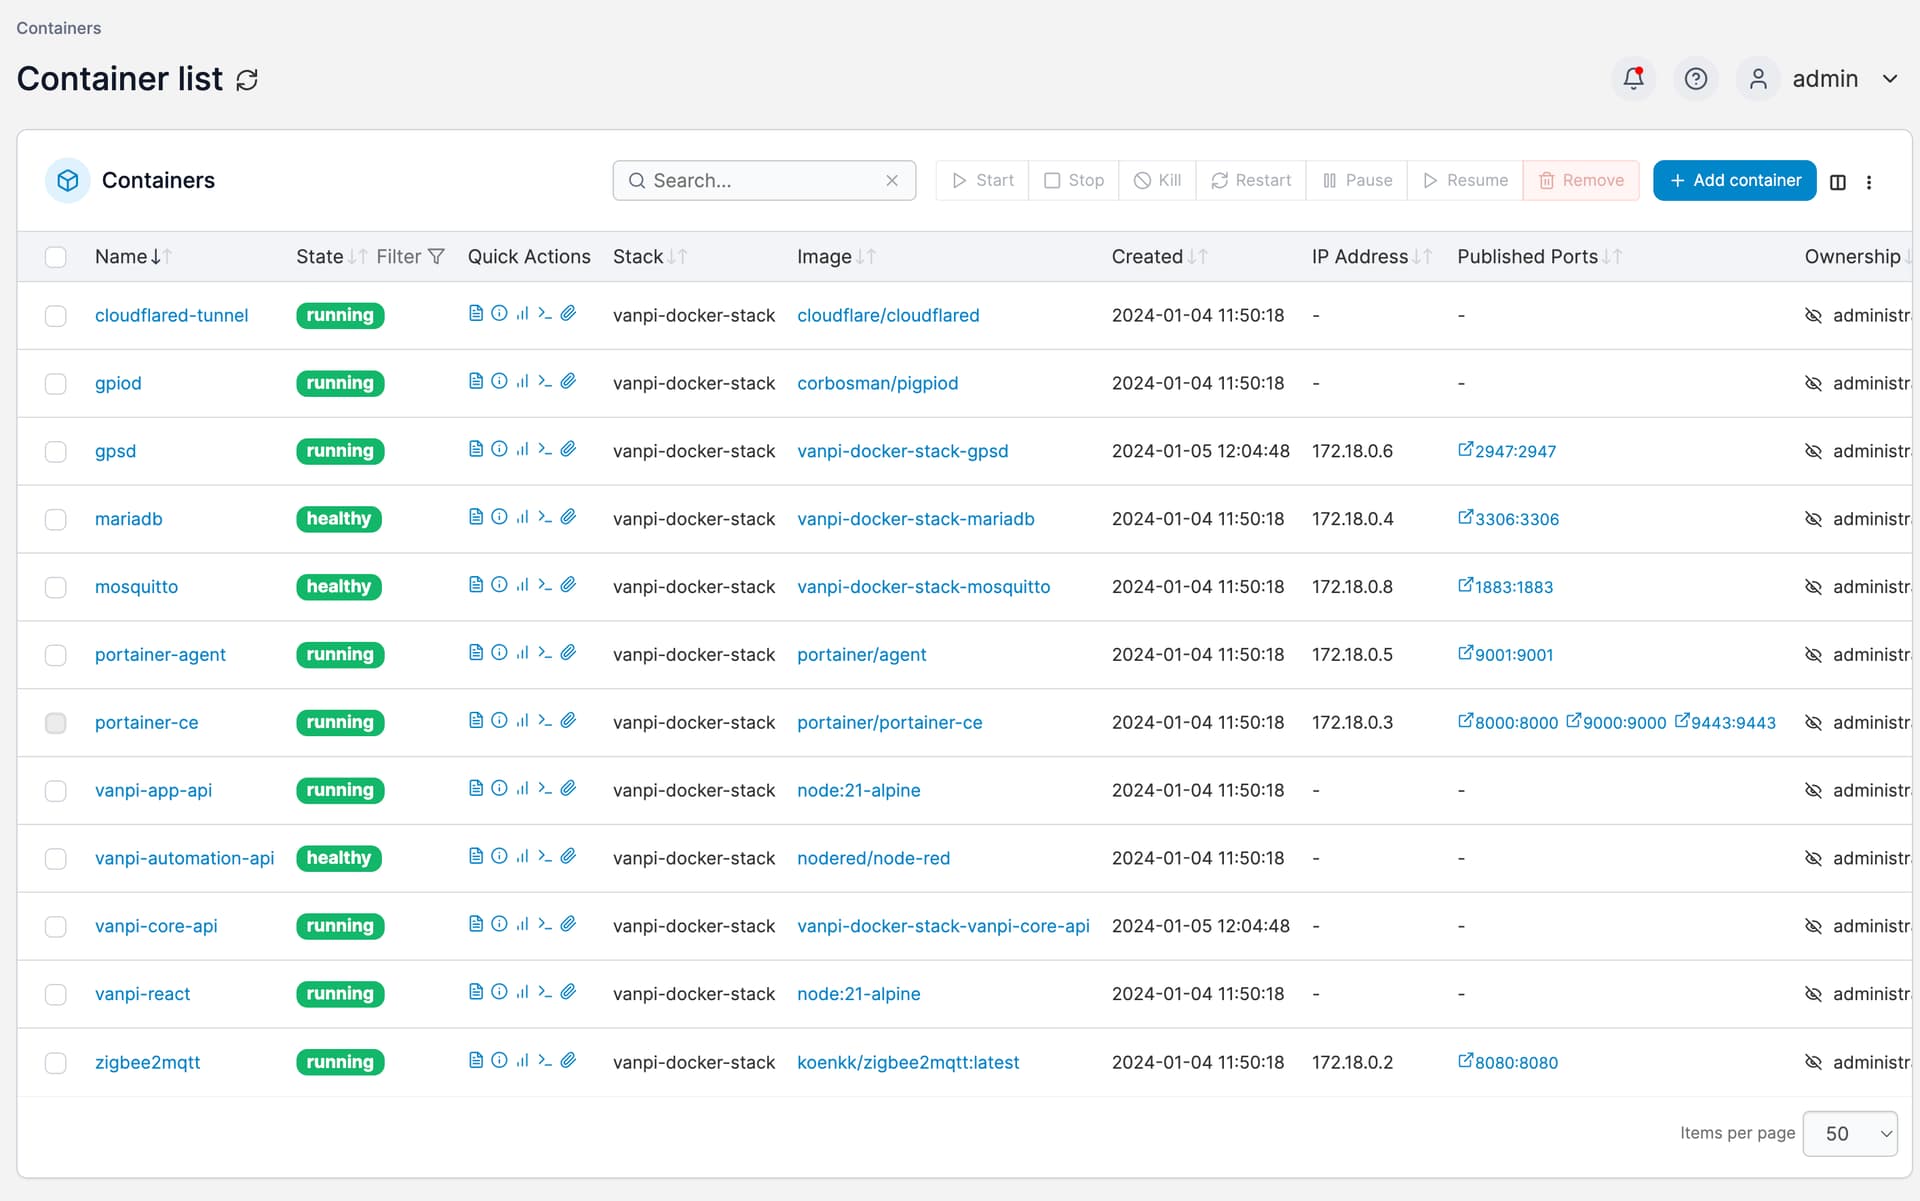
Everything is based on Docker and docker-compose, taking heavy inspiration from the IOTStack project. This allows the integration of virtually any piece of software alongside the VanPi OS, avoiding conflicts between libraries and enabling a whole bunch of extensions that would be otherwise daunting to implement.
In my case, for example, I am using a Cloudflare tunnel for secure remote access to the system (all of it: the UI, Node-Red and the terminal). I’m also running Zigbee2MQQT without having to install any dependency in the host system. Finally, I can control everything through Portainer - troubleshooting, editing and restarting each service in isolation while developing. Here is a screenshot of the stack at the moment of writing:
2. Hardware
I think it’s worth mentioning that I am currently running this on a Raspberry Pi 5 running the latest Bookworm Raspbian OS. I also got it running on a RPi 4 running Bullseye, so these two are confirmed working. Both my Pi’s have 8GB of RAM, so I am not sure how lower spec’d ones would perform.
3. VanPi core API
GitHub project: GitHub - coconup/nomadpi-core-api · GitHub
This is a massively slimmed-down version of the existing VanPi OS, providing the strict functionality needed to operate the hardware. All it offers is an HTTP API that can be used by any client to control things. An MQTT API might follow if and when I find a reasonable use case for it.
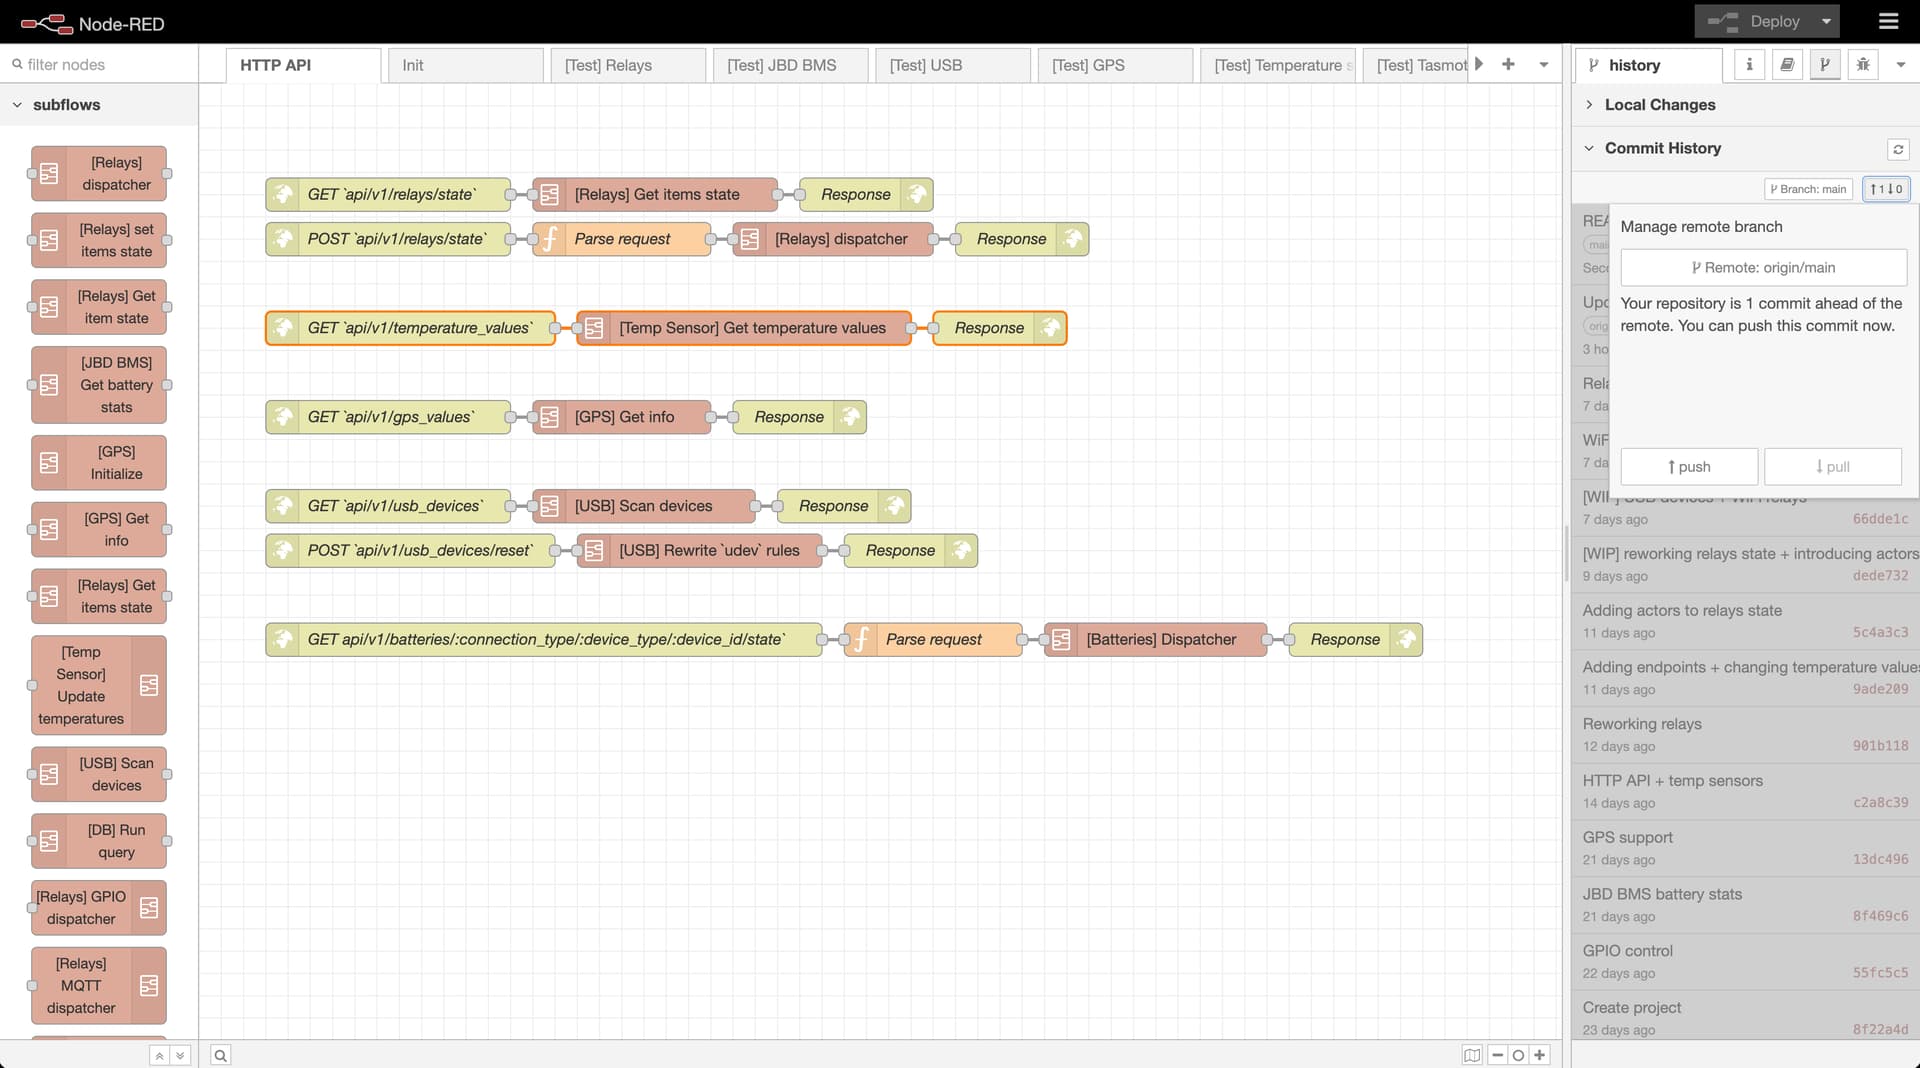
The Node-Red project should be used within the vanpi-core-api container by cloning the repository within Node-Red itself (see Node-Red projects for reference). This enables a Git development workflow where changes are pushed and pulled, PRs are possible and conflict resolution can happen within Node-Red.
Here is the list of currently supported devices, which matches exactly the hardware I have at hand and nothing less:
- Relays on the relay board
- Tasmota WiFi relays
- Temperature sensors
- JBD BMS over Bluetooth
- USB GPS dongles (I got this one)
- Zigbee USB dongles (I got this one)
The most notable missing components (imho) are:
- Heater: I want to get a Webasto + the currently sold out K-bus from the shop and add support for it. I did already some research and this should be easy, since it’s again something that goes through USB
- Tank sensors: Again due to missing hardware and I am personally leaning towards Ultrasonic distance sensors in place of the currently supported options. I haven’t spent enough time researching those, though.
- Shunt: no idea how easy or hard this would be. I don’t have a plan to include this in my build, but if anyone wants to send me one, I can give it a go.
Of course I plan on extending this as soon as I get my hands on more devices. Contributions are of course welcome. In case anyone wants to port functionality from the original VanPi OS and has access to the related hardware, feel free to fork the project and open a pull request ![]() .
.
3. VanPi automation API
GitHub project: GitHub - coconup/nomadpi-automation-api · GitHub
This is currently a proof of concept. The idea is that all automation (including timers, IoT-triggered flows, thermostat-based heater control etc.) should live here instead than in the core API.
This repo will likely include very standardized functionality (like heater control) and otherwise provide a collection of examples and merely serve as inspiration for others to create their own flows based on their needs. It is certainly the place where being able to git pull updates will be the most valuable, since these flows are going to be very specific to individual builds.
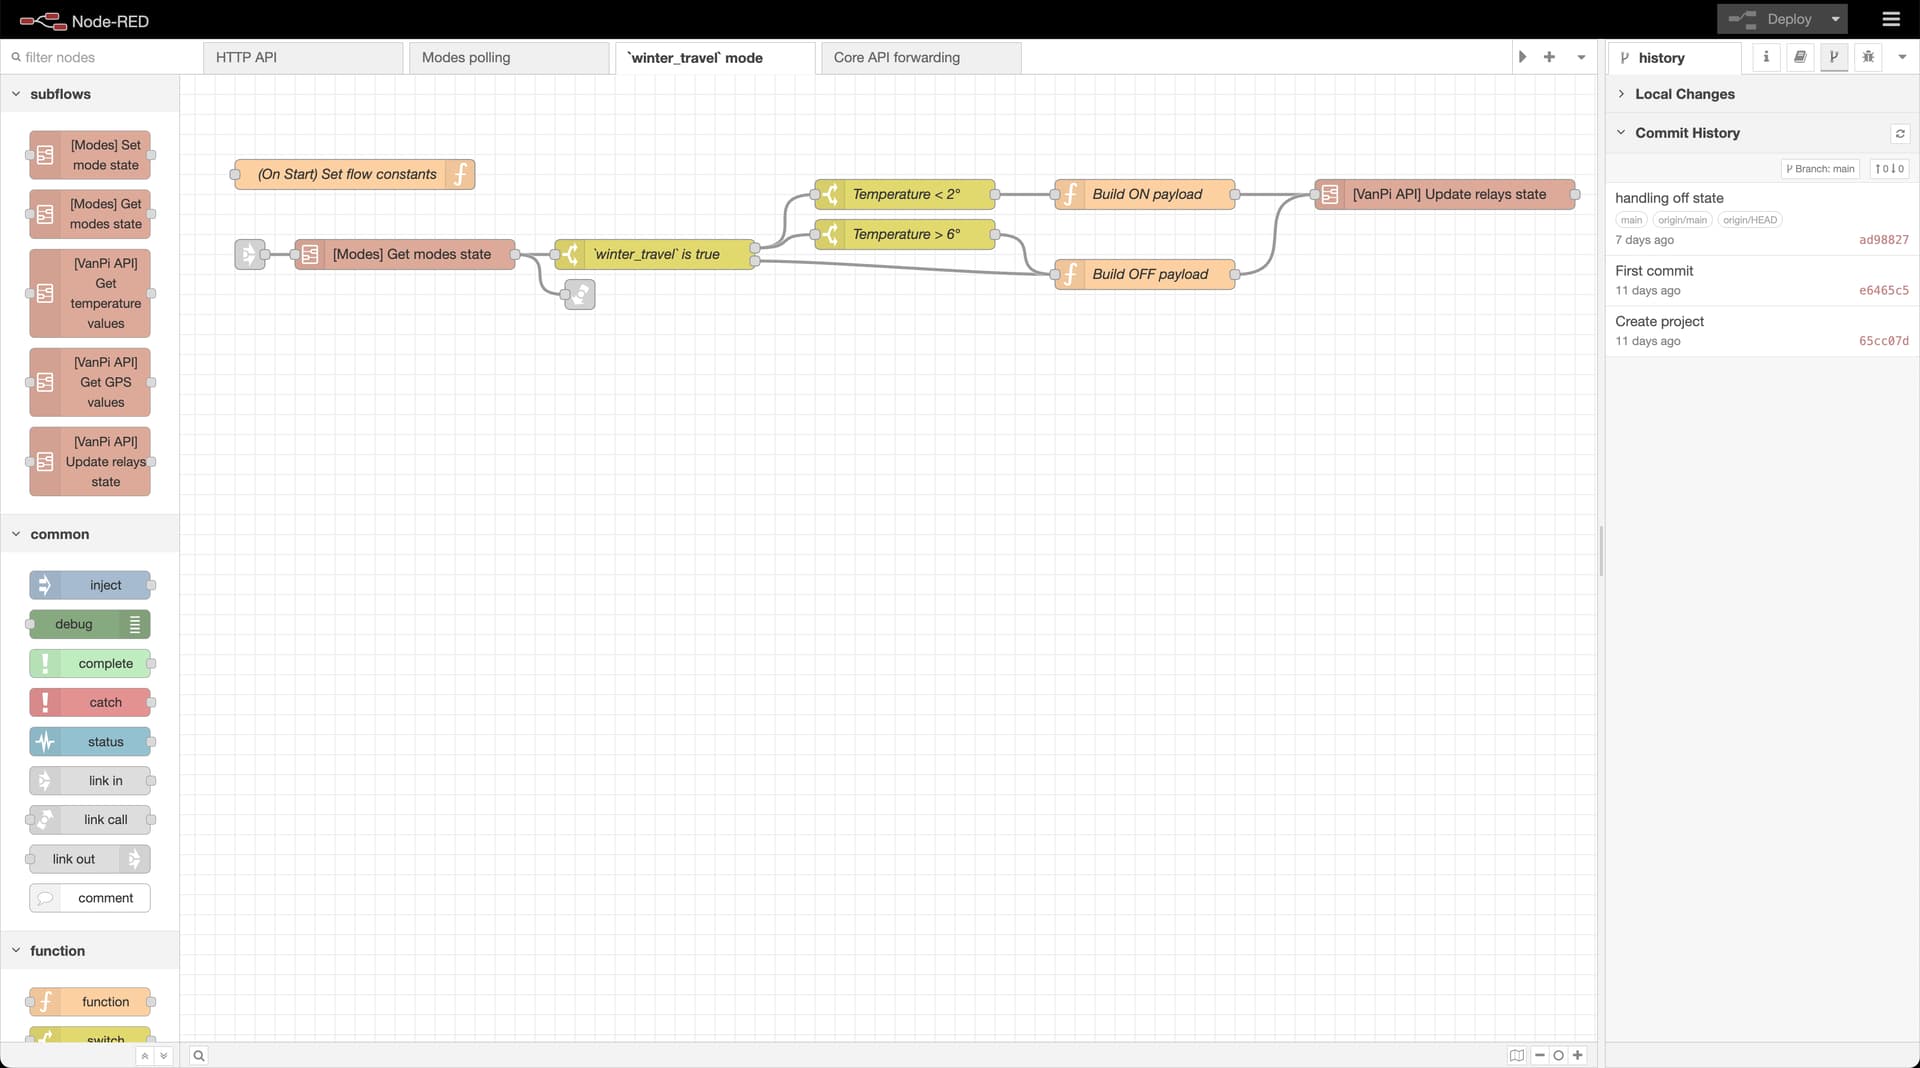
One pattern that is already implemented, and also reflected in the UI, is so-called “Modes”. In essence, it is possible to create a button through the UI which switches a “mode” on and off. This can be then the basis for automating some actions.
As an example, I have put a “Winter travel” mode which would automatically start a loop of hot water as soon as the tank temperature falls below two degrees. It would then stop such loop as soon as the temperature rises again to at least six degrees:
4. VanPi React frontend
GitHub project: GitHub - coconup/nomadpi-react · GitHub
This is likely the least mature part of the stack at the time of writing, since it’s also going to be the easiest to develop once everything else caught up with the list of required features.
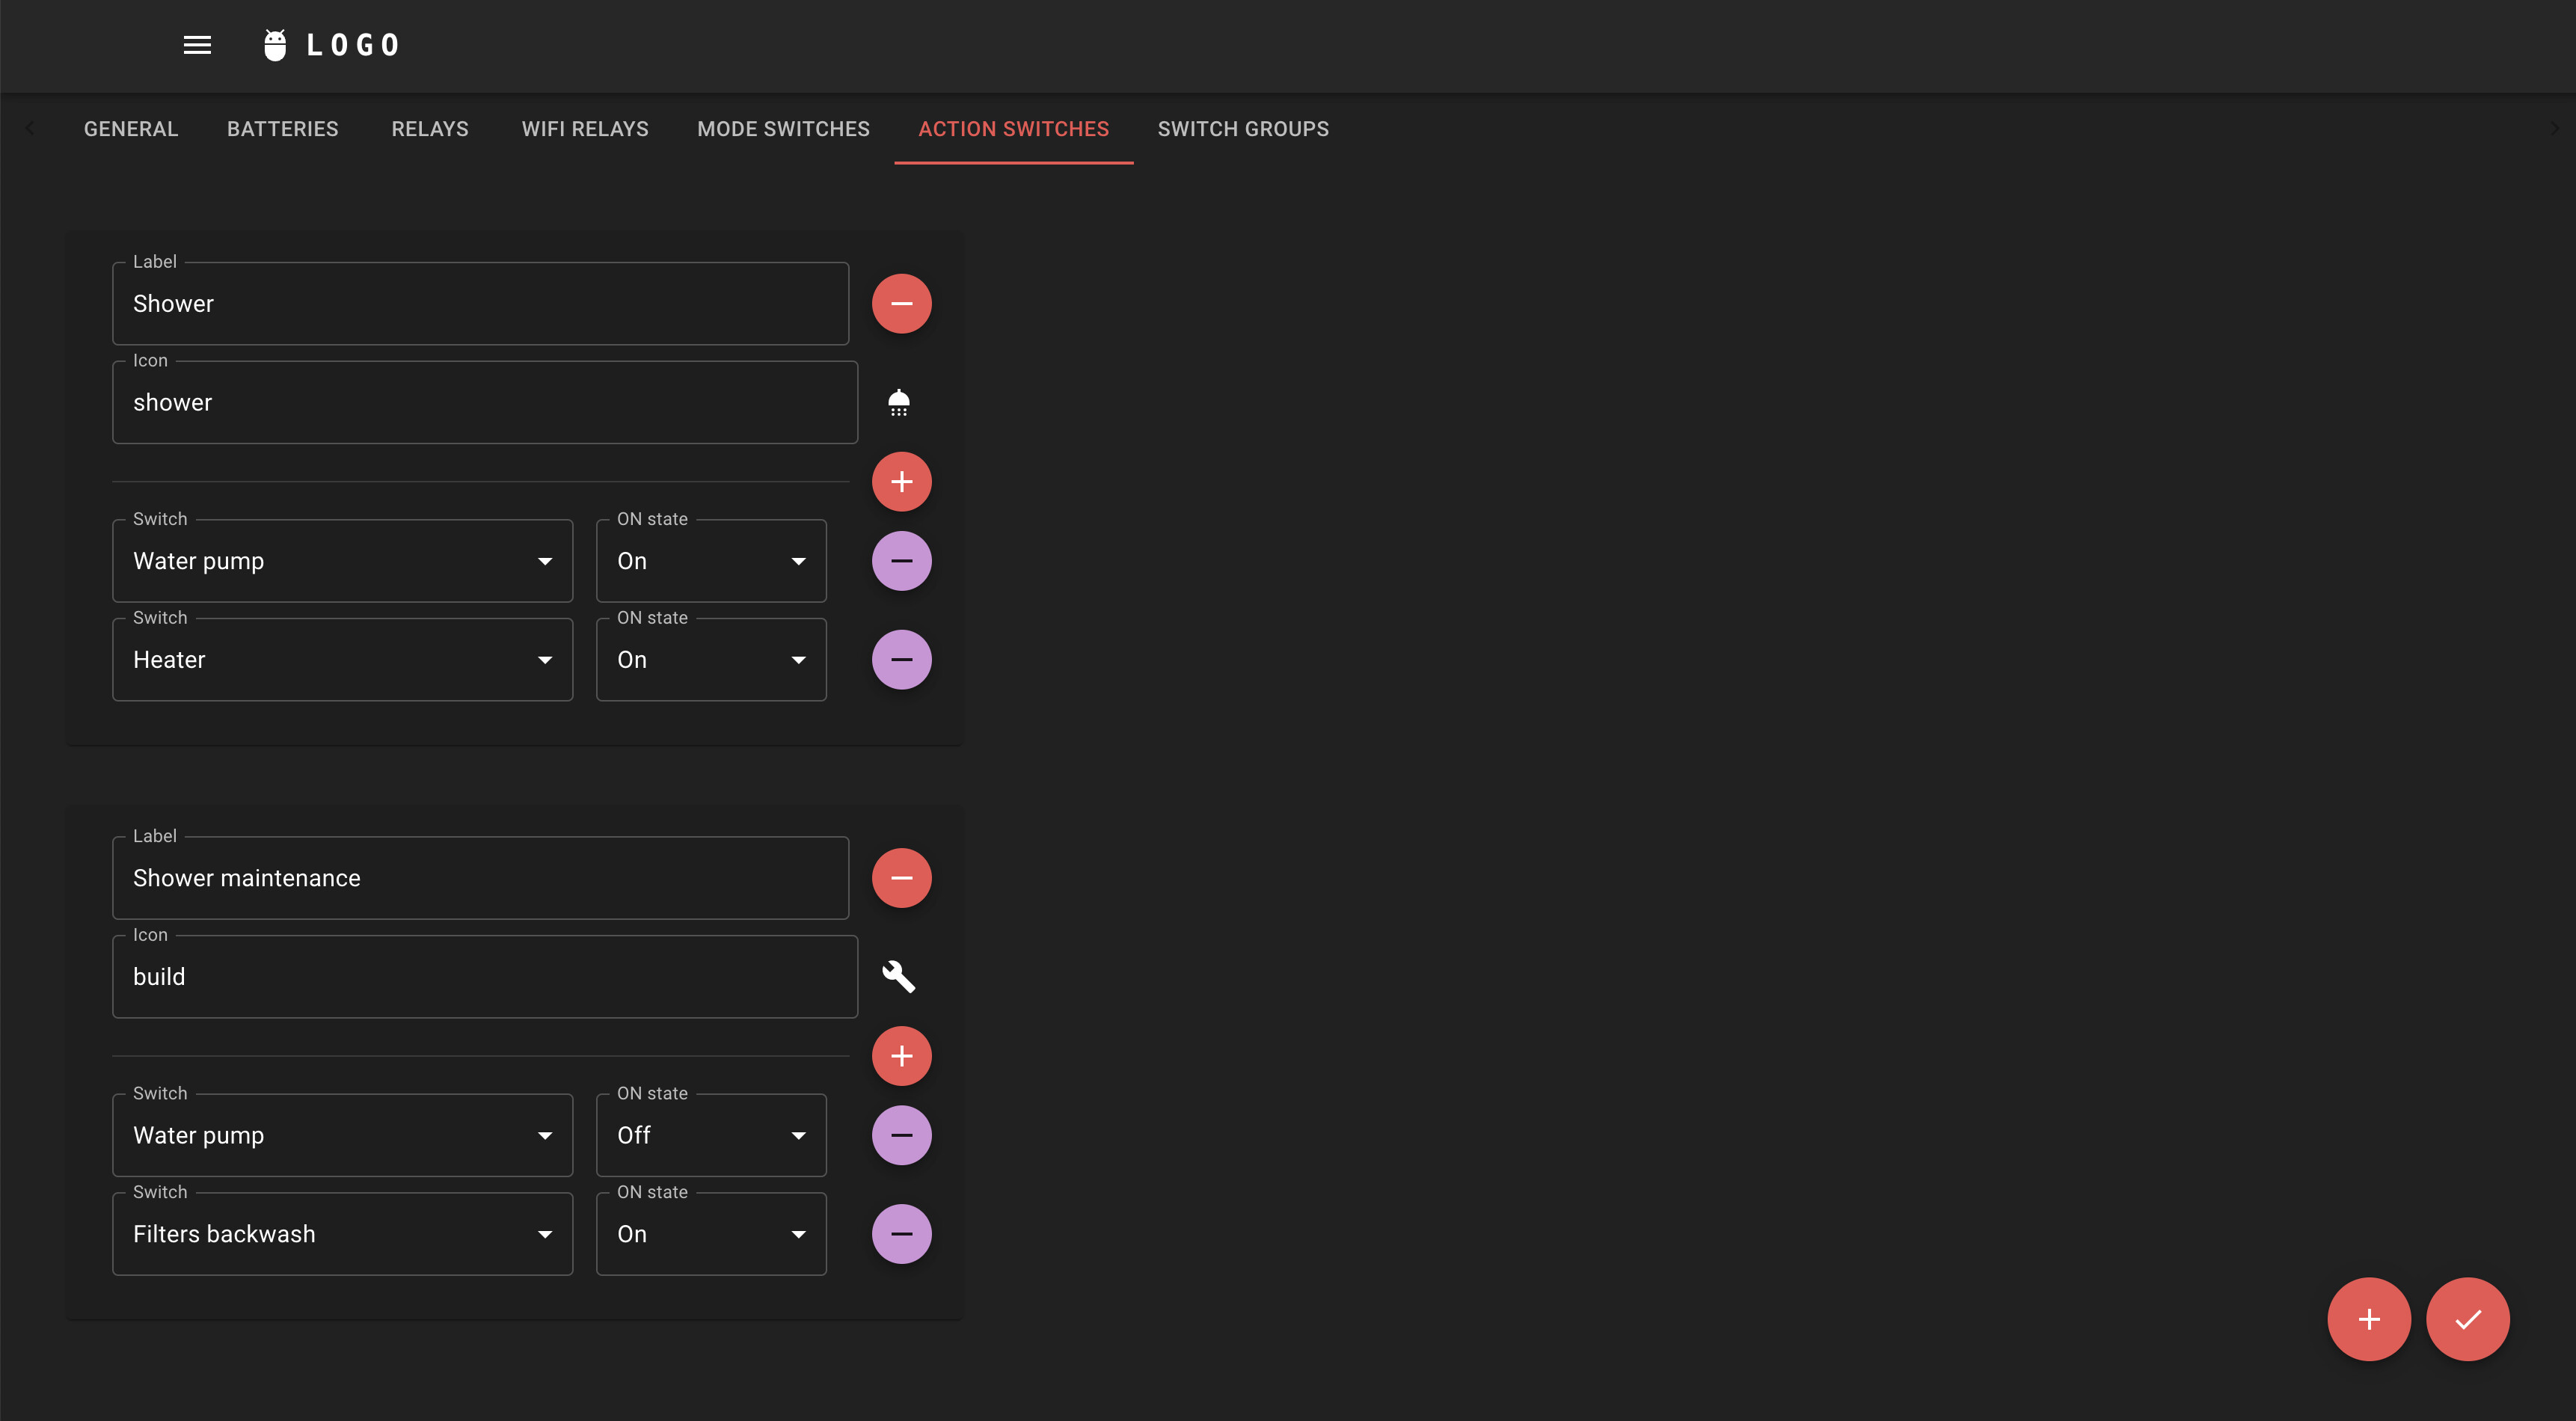
It’s a frontend written in React and therefore it can run on any browser or be embedded into an app. At the moment, it allows to define settings and organize switches (Relays, WiFi Relays, Modes and Action Switches).
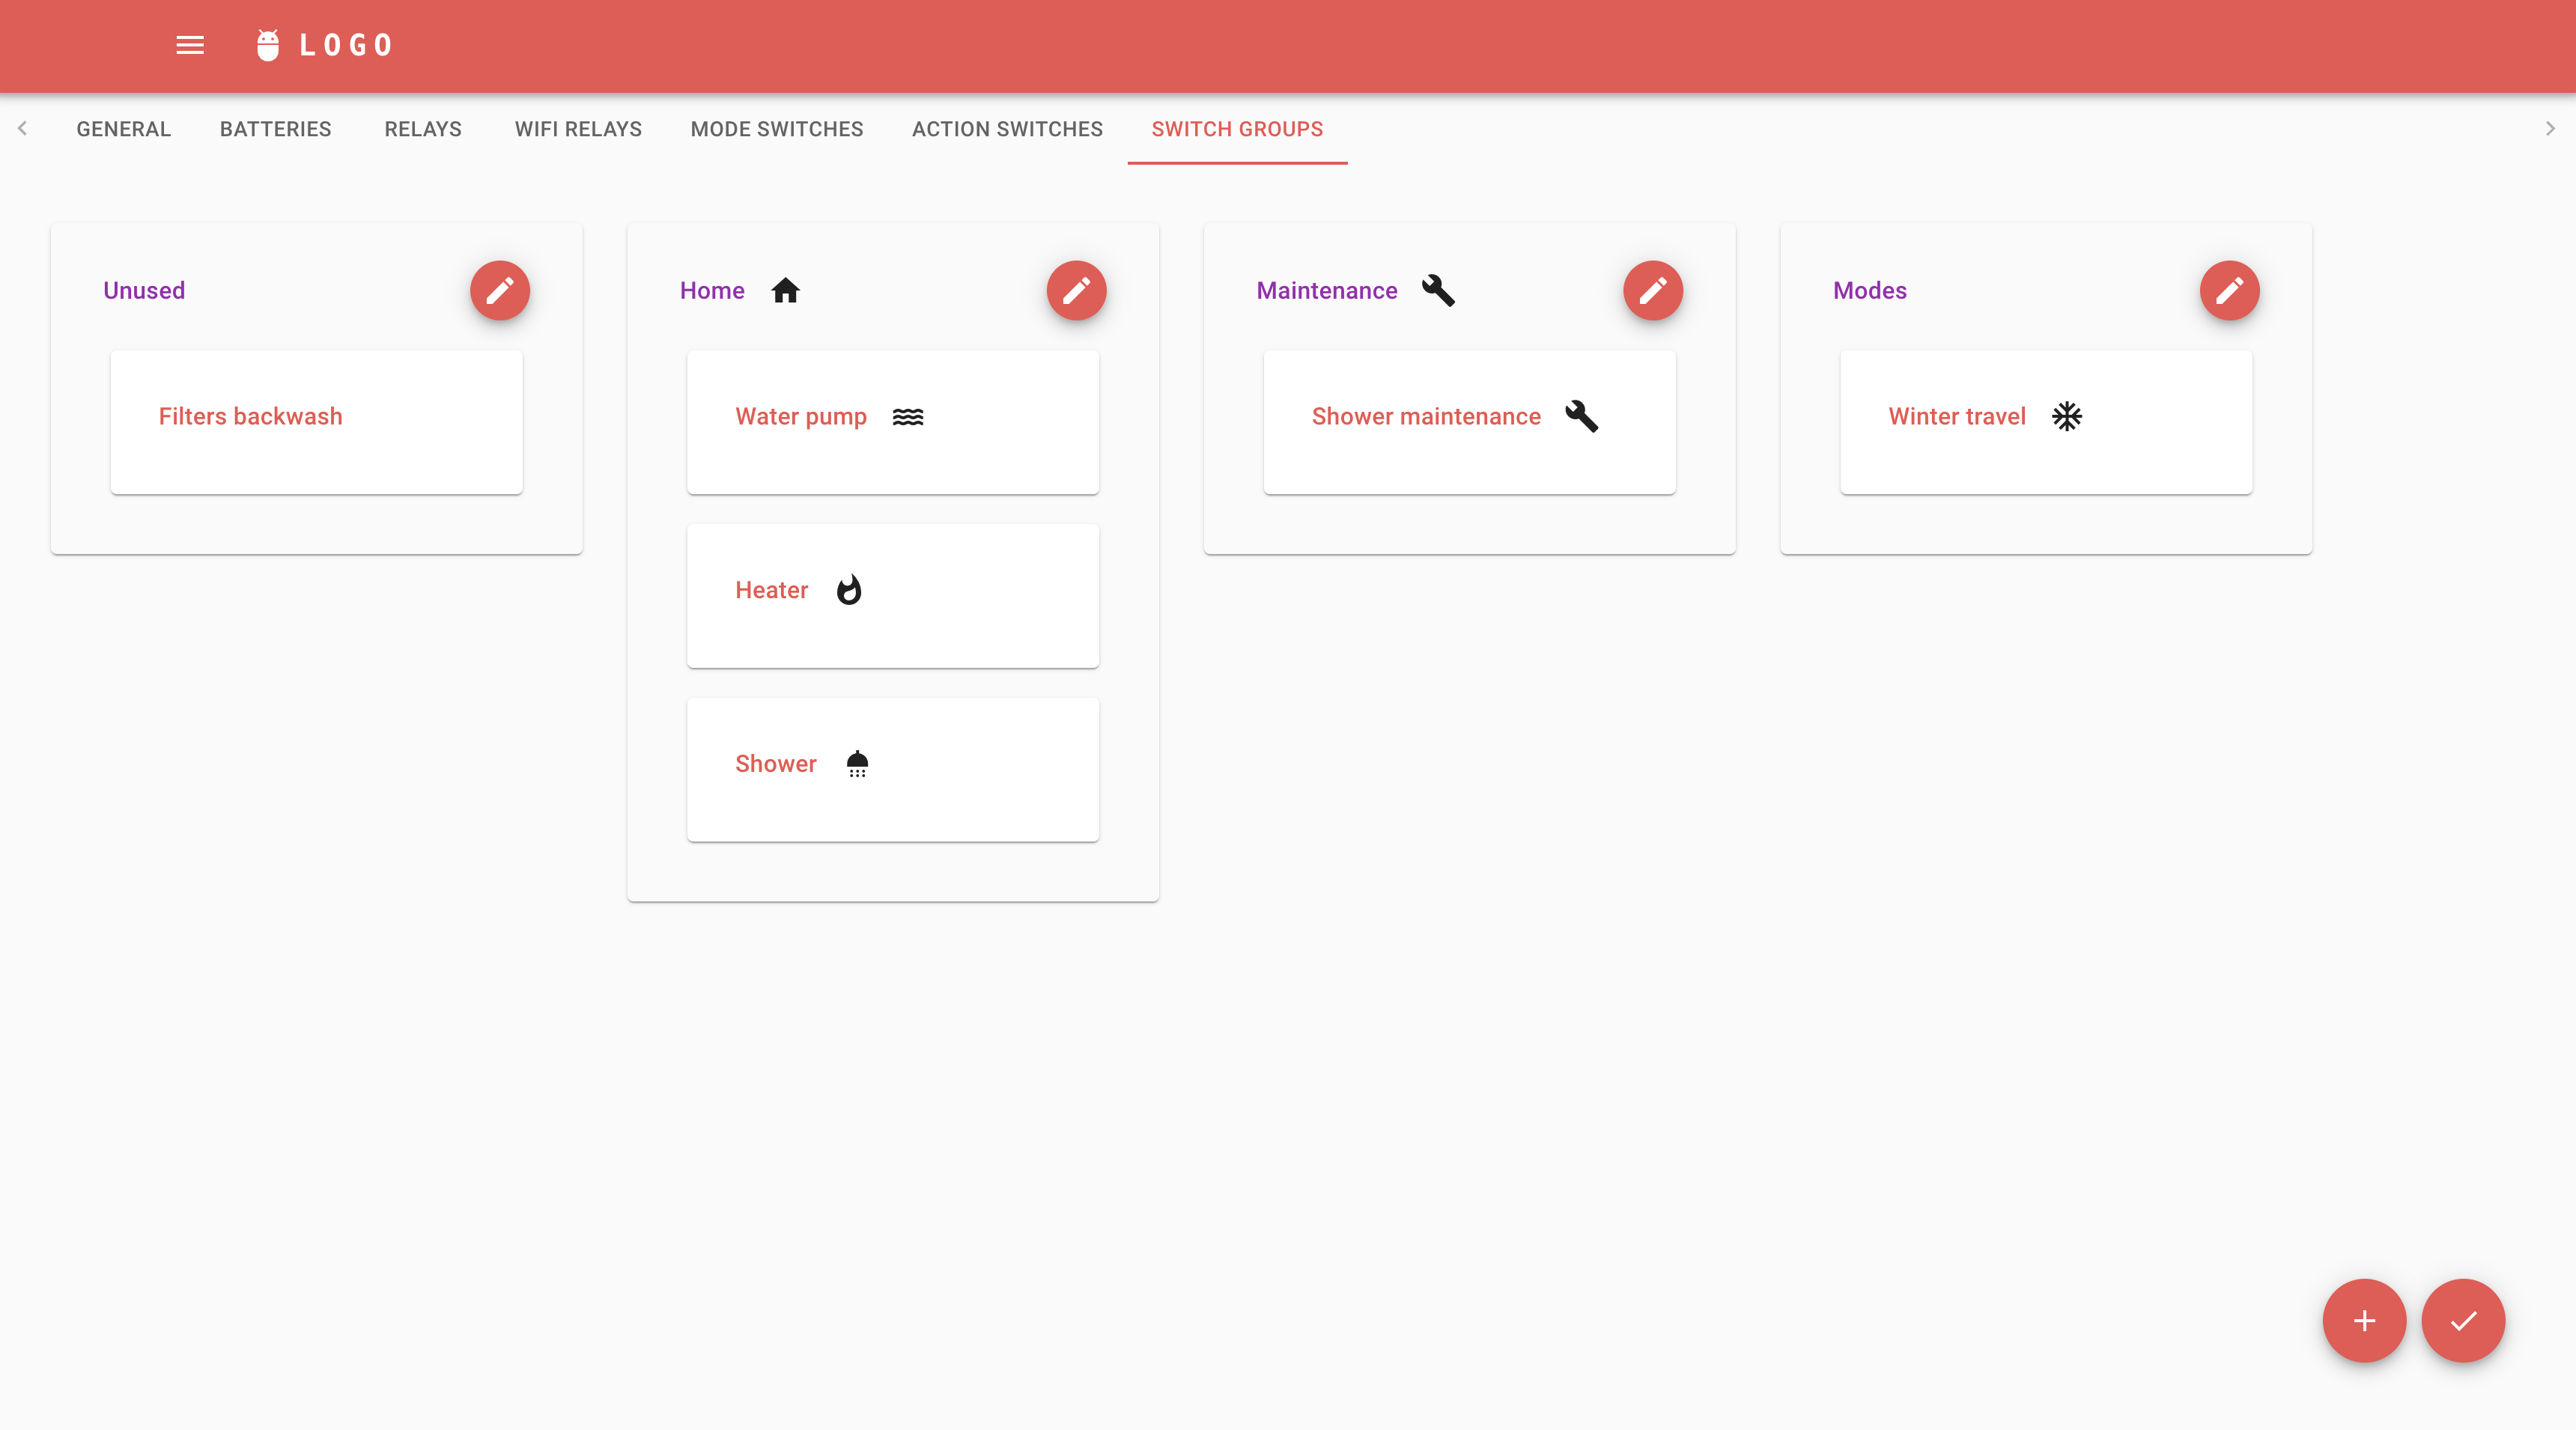
Modes were already described above, while action switches (not too happy with the name here) deserve a little explanation. These are buttons that will operate a combination of Relays and WiFi relays and force their state to either ON or OFF while the button is active.
This means you can, for example, have a single “Shower maintenance” switch that will simultaneously turn off the water pump and open some valve for water disposal. Conflicts with other switches are also handled, so as long as something like the above is turned “on”, it will not be possible for another switch to turn on the water pump.
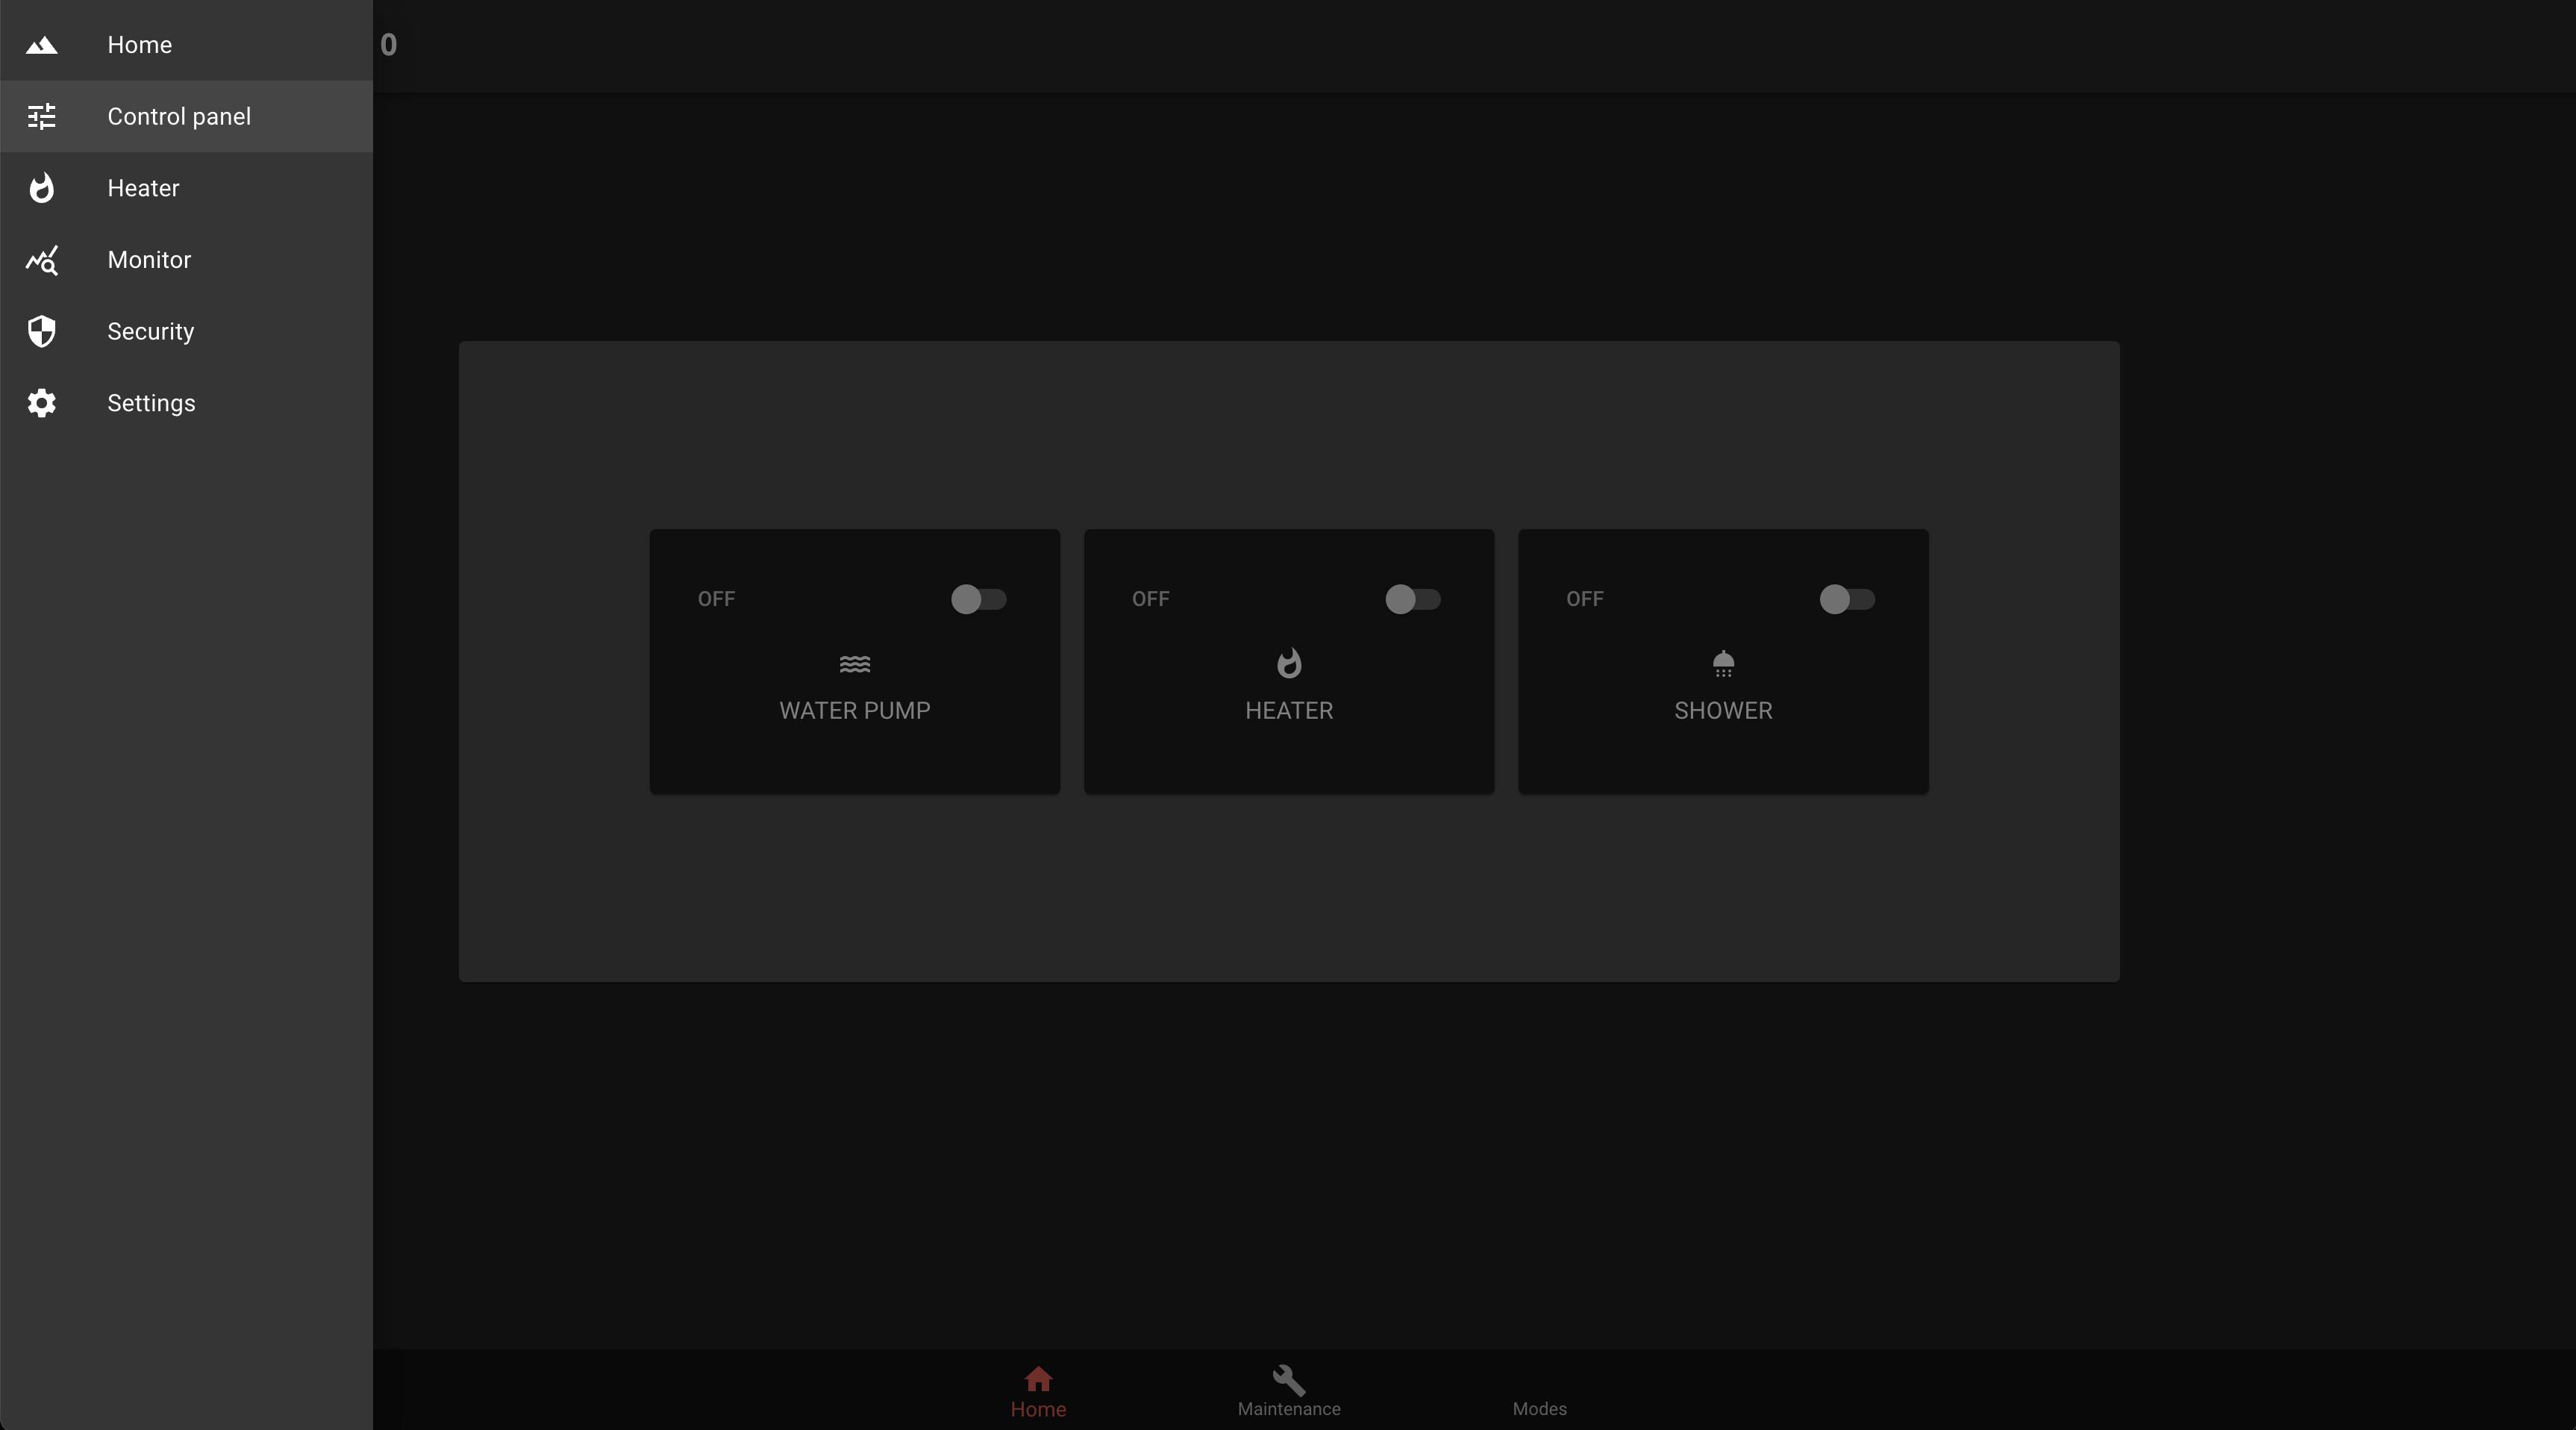
Since it became dark while I was writing this, the next screenshots automatically switched to “night mode”:
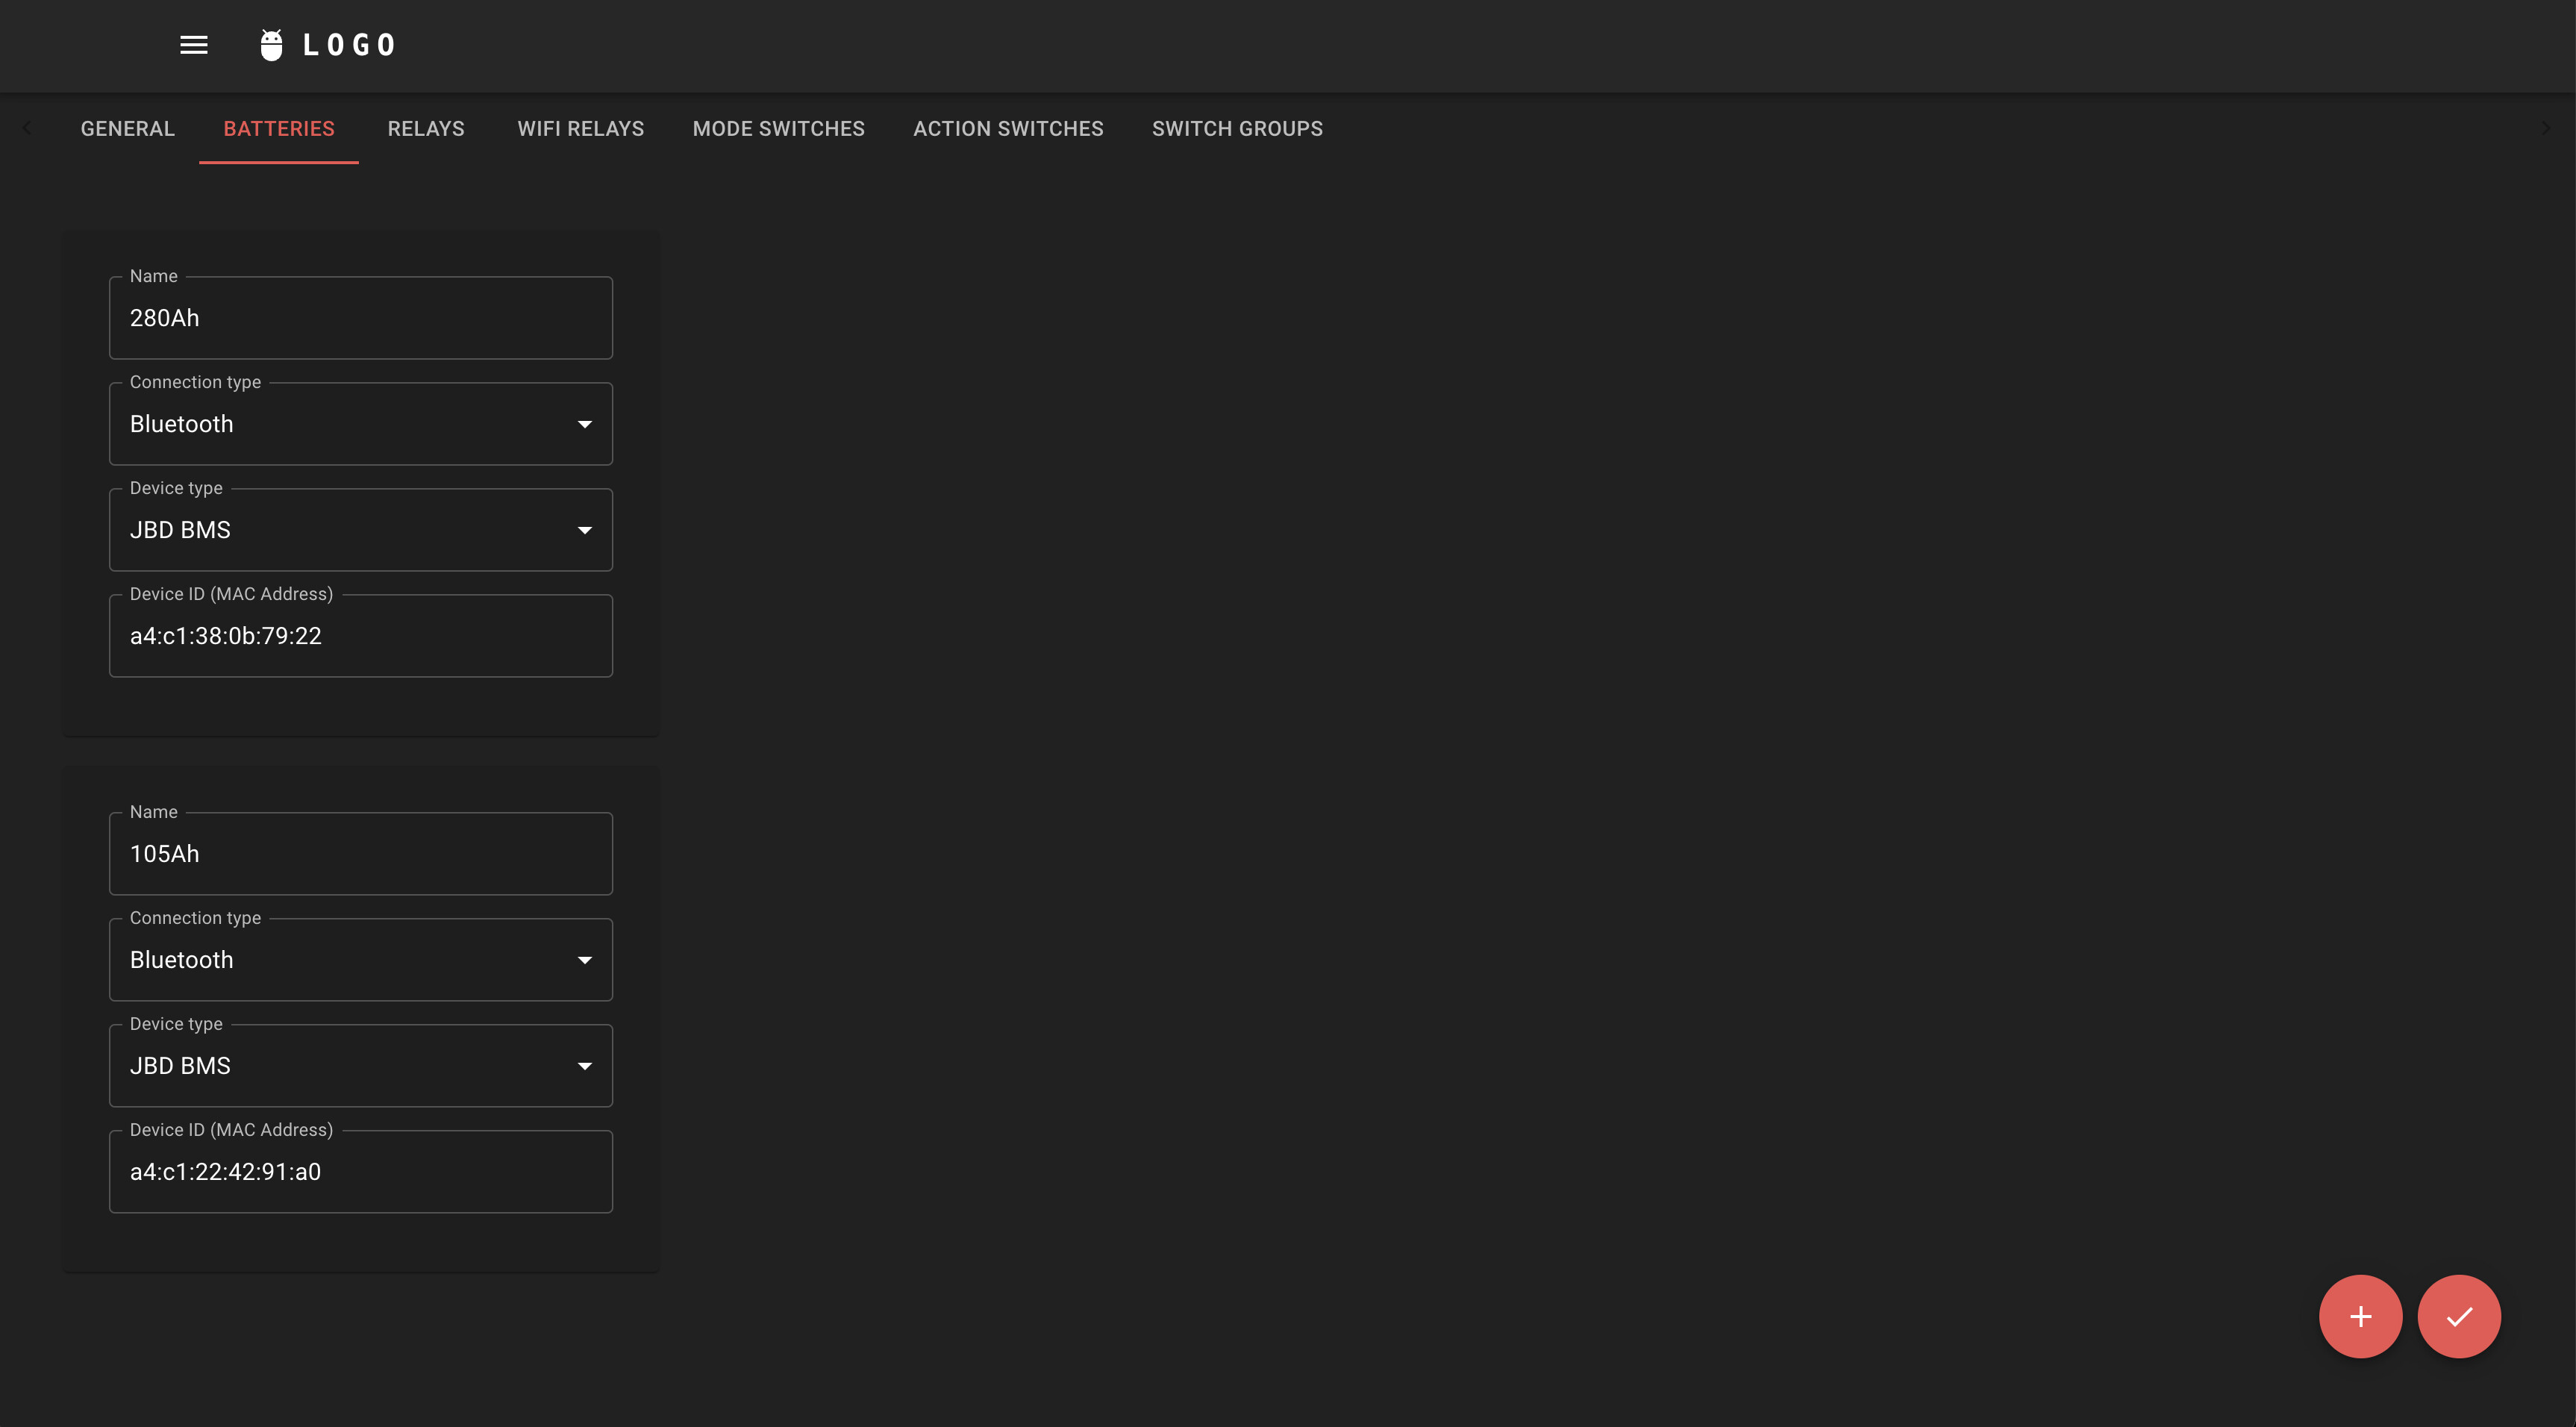
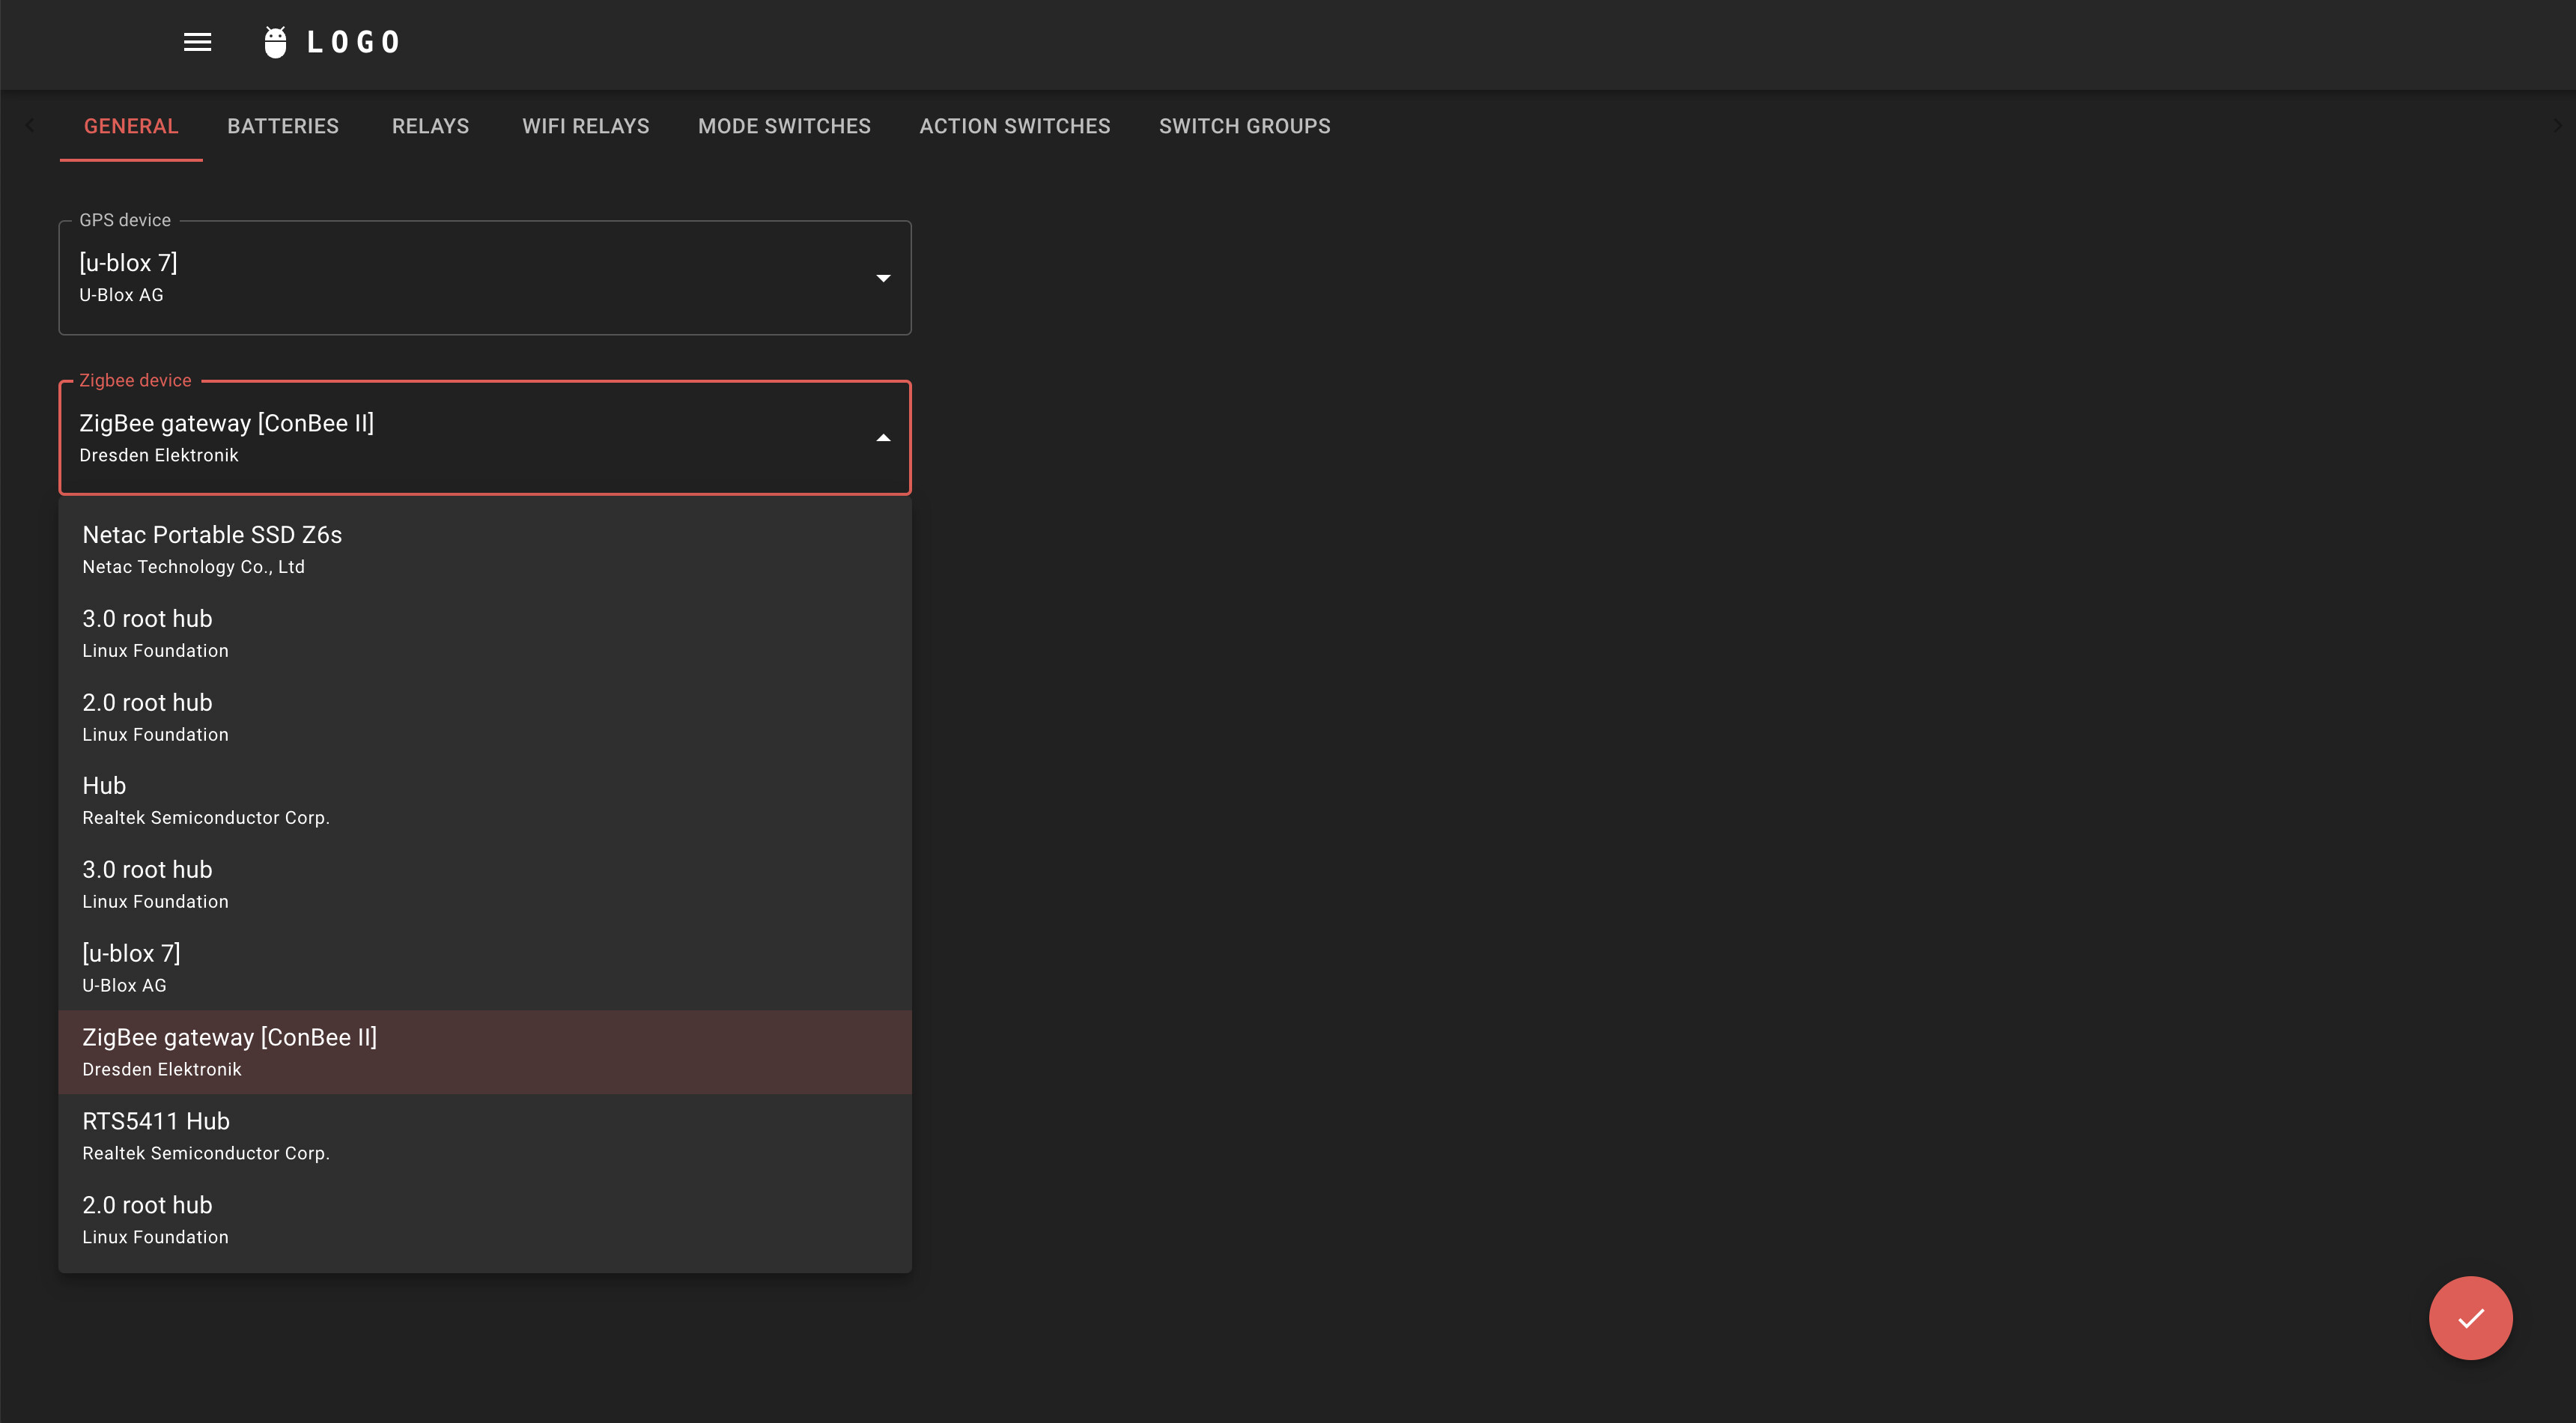
Other settings at the moment include adding batteries (plural) and setting a GPS and Zigbee USB device. These will be remembered even if you swap ports around or add a USB Hub, unlike in the original implementation:
5. VanPi App API
GitHub project: GitHub - coconup/nomadpi-app-api · GitHub
This is the backend utilized by the React App, which provides the needed functionality to handle resources (Switches, batteries, settings etc.). It also acts as an intermediary to the more low-level APIs described above.
Advantages for Final Users:
This is a list of what I think are end-user advantages of the current and envisioned implementation.
1. Enhanced Hardware compatibility:
The system is compatible with newer hardware, including Raspberry Pi 5 on Bookworm and RPi4 on Bullseye.
2. Enhanced Software compatibility:
The system can be much more easily paired with other widespread, end-user facing software like Home Automation, thanks to the fact that everything is containerized.
3. Extended switches / relays features
Organize switches into categories and control multiple relays with a single switch button. Define “Modes” through the UI and automate actions through Node-Red based on their state.
See the writeup above for more details.
4. Native support for multiple batteries
An endless amount of batteries can be configured in the UI.
5. Cleaner, more modern UI
Only show what is relevant and allow the user to choose how to organize their dashboard.
Additionally, building a UI in React allows for adding any sort of widget which is freely available (weather forecast, maps etc.).
6. Improved USB Support
The way USB devices are handled has been greatly improved, with the result that:
- Devices are recognized automatically once added, regardless of the USB port used.
- Support for USB hubs allows for the connection of more devices beyond the standard four ports of the Pi.
7. Native Support for other commonly needed devices
At the moment, I am using these devices with native support:
8. Actually secure remote access through Cloudflare
A Cloudflare tunnel integration allows for secure access to VanPi from anywhere in the world (as long as the Pi is connected to the internet), without the need for any extra hardware. I want to write up a guide of all the steps involved in setting this up, but I basically followed this video with little adaptations: https://www.youtube.com/watch?v=ZvIdFs3M5ic
9. Simplified Update Process:
Updates can be streamlined with a simple git pull command and don’t involve any manual copy-pasting of flows, if they were ever edited by the user.
Advantages for Developers:
Similarly, this is a list of what I personally see as significant advantages for anyone wishing to develop the platform further:
1. Docker-Based Architecture:
This is imho a game changer over any solution that requires dependencies being installed in the host machine. It makes services run in isolation, avoiding conflicts and easily allowing to add / remove / troubleshoot any component in the system. It also allows for the whole system to be much more portable and generally lightweight. The setup is much faster than the original “Manual setup” procedure, and also much less prone to incompatibilities arising. I actually did not manage to get through the manual installation process of VanPi OS on my RPi4, for whatever reason.
2. Hardware compatibility
I think it’s important for any developer to know they can work in the latest version of hardware (RPi5) and software (Linux). This is an almost direct effect of switching over to docker, since local dependencies are virtually non-existent and everything is containerized within the Pi.
3. DRY code and proper separation of concerns
Going back to the motivation paragraph I wrote above, I think this is the main point being addressed by the rewrite. Define logic once, where it belongs, and use it from anywhere.
4. Git-Based Development Workflow
In my mind this could unlock the real open source potential of this project. Making changes, proposing them through pull requests, getting someone to review them and eventually merging them upstream is here possible and in fact natural.
5. Cloudflare Integration
I have actually been developing most of this while being at my parents’ place over Christmas, while my hardware was sitting in my living room at home some 1,000km away. This is possible because of the Cloudflare tunnel which not only allows access to Node-Red and to the UI remotely, but also allows opening an SSH session to the terminal from the browser. As I wrote above - I want to write up a guide of all the steps involved in setting this up, but I basically followed this video with little adaptations: https://www.youtube.com/watch?v=ZvIdFs3M5ic
6. Database-Backed Application:
The application now relies on an actual database (MariaDB), providing structure and consistency. This allows to extend the API logic horizontally without making a mess, thanks to common concepts like primary / foreign keys, uniqueness constraints and so on. It also allows a safer storage of credentials through encrypted columns, in case any third party service should be integrated into the stack (I plan on integrating Blink cameras, for example).
7. API-based stack
The core system is developed as an API, which is consumed primarily by the rest of the stack. This means the API will, by definition, always be up to date. The fact that the OS is an API makes it easy to write different clients for it, integrate it in different automation systems and so on.
Conclusion
This take me quite a long time to write up so I hope it was worth it. To whomever went through the whole wall of text, thank you ![]() . And of course thank you to the core Pekaway team for the invaluable ground work that made all of this rather easy to achieve. If anyone has any feedback and/or is interested in starting a conversation, I’d be happy to do so.
. And of course thank you to the core Pekaway team for the invaluable ground work that made all of this rather easy to achieve. If anyone has any feedback and/or is interested in starting a conversation, I’d be happy to do so.