New Image v2.0.2

Das Update für v2.0.2 ist online.

Direkt zum Download

Den vollen Changelog findet ihr bei Github

(English Version below!)


Zuerst vorweg: Ein direktes Upgrade von Versionen niedriger als v2.0.0 BETA2 ist nicht möglich, weil wir dort das Betriebssystem von Debian 10 (Buster) auf Debian (12) Bookworm geupdated haben.
Für alle Versionen darüber steht das Updatescript bereit, es kann also direkt aus der Software heraus über die Update Funktion geupdated werden. Neu im Updatescript ist, das automatisch ein kompletter Neustart ausgeführt wird. Das ist generell ja eh nie verkehrt, nötig ist es weil wir mit v2.0.2 den Raspberry Pi 5 unterstützen und dort die /boot/firmware/config.txt bezüglich der UART Ports entsprechend angepasst wurde. Das updatescript.sh könnte aber auch manuell ausgeführt werden, dann werdet ihr gefragt ob ihr neu starten wollt oder nicht.

Die wichtigsten Änderungen im Überblick:

  • Es gibt jetzt unter Config > System die Option einen Switch zu setzen, der einstellt ob man das schwarze Relayboard (2023) benutzt (oder standardmäßig das VANPI Core). Damit werden dann die Flows für den RJ11 Shunt aktiviert, die ebenfalls die Wassertanks abfragen. Die Shunt Einstellungen sind dann trotzdem zu finden im Menü unter Wireless > Pekaway Shunt, da nicht verwirren lassen von dem “Wireless”.
  • Wenn man die digitalen Inputs zum Dimmen benutzt, kann man nur noch bis minimal 5% runterdimmen. Das hilft Situationen zu vermeiden, bei denen der zuletzt gespeicherte Wert 0 ist und man zum anschalten erst wieder langsam hochdimmen muss, anstatt per kurzem Knopfdruck einfach wieder anschalten zu können. Zusätlich, wenn die LED aktuell aus ist und der zuletzt gespeicherte Wert kleiner als 10% ist, dann wird beim Anschalten auf 20% gestellt.
  • Die Temperatursensoren können nun Positionen zugeordnet werden. Dafür wurde das ds18b20.py Script überarbeitet und gibt jetzt die Sensor IDs mit aus. Anhand dieser IDs werden die Positionen gesetzt. Beim ersten Auslesen der Sensoren werden diese in Reihenfolge den ersten 4 Positionen zugeordnet und festgeschrieben. Alle weiteren Sensoren werden als zusätzliche Sensoren angezeigt und können dann über ihre IDs weiter abgefragt und angezeigt werden. Nur die ersten 4 Positionen sind fix. Ein ausgefallener Sensor wir mit “N/A” angezeigt. Will man diesen ersetzen, dann muss man manuell die alte ID mit der des neuen Sensors überschreiben, das passiert im Menü > Sensors > Temp Sensor Positions. Solange eine der vier Positionen frei ist und ein neuer Sensor gefunden wird, wird er automatisch an diese Position geschrieben.
  • Die Einstellungen für den Boiler wurden verschoben nach Config > System > Boiler Control. Dort kann nun zusätzlich ein Tankgeber ausgewählt werden (optional), der den Boiler davor schützt bei zu niedrigem Wasserlevel anzuspringen. Läuft der Boiler und das Wasserlevel ist zu niedrig wird der Boiler automatisch abgeschaltet (wenn die automatische Boiler Überwachung eingeschaltet ist), die Automatik wird dabei mit ausgeschaltet, sodass der Boiler nicht automatisch wieder angeht. Der Boiler kann unabhängig davon aber manuell immer geschaltet werden.
  • RPI5 Support:
    • Für den 5er Empfiehlt sich auf jeden Fall eine aktive Kühlung. Es gibt dafür Aluminiumkühlkörper mit Wärmeleitpads und integriertem Lüfter, die ohne Probleme zwischen die Platine und den Pi passen.
    • Die Positionen der USB-Ports sind anders als beim 4er, dafür hab ich eine neue Tabelle unter Config > System eingebaut. Die Blende des Gehäuses wird dadurch aber nicht mehr passen.
    • Zigbee ist jetzt an USB1 (4er immer noch USB2) und USB-GPS and USB2 (4er immer noch an USB1), also einmal oben und unten getauscht. Die UDEV rules wurden entsprechend angepasst
    • Es wird jetzt ‘pinctrl’ benutzt um die GPIOS auf dem 5er einzustellen, auf dem 4er weiterhin RPI-GPIO

Als nächstes mach ich das Initialisierungsscript fertig, dann kann man sich ein cleanes Raspi OS (oder direkt Debian Bookworm) flashen und dann mithilfe des Scripts alle benötigten Komponenten für VANPI installieren. Das kann zum Beispiel hilfreich werden, wenn man eine Version mit Desktopoberfläche benutzen möchte.
Danach kommt das Heizungsupdate für November, das nächste größere Update ist für März 2025 geplant.


English version:

First of all: A direct upgrade from versions lower than 2.0.0 BETA2 is not possible because we updated the operating system from Debian 10 (Buster) to Debian 12 (Bookworm).
For all versions above that, the update script is available, so you can update directly from the software via the update function. New in the update script is that a complete restart is automatically executed. This is generally a good idea anyway, but it’s necessary because, with version 2.0.2, we support the Raspberry Pi 5, and the /boot/firmware/config.txt has been adjusted for the UART ports.
The updatescript.sh can be executed manually as well, it will then ask you if you want toreboot or not.

Overview of the most important changes:

  • There is now an option under Config > System to set a switch that determines whether you are using the black relay board (2023) or, by default, the VANPI Core. This will activate the flows for the RJ11 shunt, which also queries the water tanks. The shunt settings can still be found under Wireless > Pekaway Shunt, so don’t get confused by the “Wireless” label.
  • When using the digital inputs for dimming, you can now only dim down to a minimum of 5%. This helps to avoid situations where the last saved value is 0, and instead of turning the lights back on with a simple button press, you would have to slowly dim them up again. Additionally, if the LED is currently off and the last saved value is lower than 10%, it will be set to 20% when turned back on.
  • Temperature sensors can now be assigned to specific positions. The ds18b20.py script has been revised to output the sensor IDs. Positions are assigned based on these IDs. When the sensors are first read, they are assigned to the first 4 positions in sequence and locked in. Any additional sensors will be displayed as extra sensors and can be queried and displayed by their IDs. Only the first 4 positions are fixed. If a sensor fails, it will be shown as “N/A”. If you want to replace it, you must manually overwrite the old ID with the new sensor’s ID in Menu > Sensors > Temp Sensor Positions. As long as one of the four positions is free and a new sensor is detected, it will automatically be assigned to that position.
  • The settings for the boiler have been moved to Config > System > Boiler Control. There, you can now also optionally select a tank sensor that prevents the boiler from turning on when the water level is too low. If the boiler is running and the water level is too low, the boiler will automatically shut off (if the automatic boiler monitoring is enabled). The automatic monitoring will also be disabled, so the boiler won’t automatically turn back on. However, the boiler can still be manually switched on at any time.
  • Raspberry Pi 5 Support:
    • Active cooling is strongly recommended for the Pi 5. There are aluminum heatsinks with thermal pads and integrated fans that fit easily between the board and the Pi.
    • The positions of the USB ports are different from the Pi 4, so I’ve added a new table under Config > System. However, the case panel won’t fit properly anymore.
    • Zigbee is now on USB1 (still USB2 on the Pi 4) and USB GPS is on USB2 (still USB1 on the Pi 4), so they’ve been swapped between the top and bottom. The UDEV rules have been adjusted accordingly.
    • ‘pinctrl’ is now used to set the GPIOs on the Pi 5, whereas on the Pi 4, it’s still using RPI-GPIO.

Next, I’ll finish the initialization script, so you’ll be able to flash a clean Raspberry Pi OS (or directly Debian Bookworm) and then use the script to install all the necessary components for VANPI. This could be useful, for example, if you want to use a version with a desktop environment.
After that, the heating update is scheduled for November, and the next major update is planned for March 2025.
3 Likes

@Vincent
Moin Vincent,
ich hab da ein Problem mit der v2.0.2.
wenn ich meinen ganzen Kram importiere, läuft Node-red nicht mehr hoch,
verbindung zum Server unterbrochen.
in der Settings.js habe ich diesen Wert
//apiMaxLength: ‘5mb’, schon auf
apiMaxLength: ‘15mb’,
(Das hast du mal irgendwo im Forum beschrieben :wink: )
gesetzt, aber es ändert sich auch nach einem Neustart nichts.
In der v2.0.1 ist die flows_pekaway.json auch 6.004.341 Bytes groß.
und in der Settings.js wurden keine Änderungen vorgenommen.
Hast du eine Ahnung woran das liegen kann???
Gruß Arno

Hey @ahtdf,
Also prinzipiell läuft alles wie es soll, bis du die originale flows file mit deiner ersetzt, richtig?
Log dich mal bitte mit Putty ein, dann NR stoppen mit

sudo systemctl stop nodered.service

und dann NR manuell starten:

node-red

dann siehst du direkt was NR genau macht und da sollten wir auch erkennen können was der Fehler ist.

Kooomisch,
nachdem ich jetzt das 10 mal gemacht habe was ich vorher auch gemacht habe,
läuft es.
Das System hat eindeutig Angst vor dir :wink:
Ich habe das
//apiMaxLength: ‘5mb’,
//apiMaxLength: ‘15mb’,
wieder zurückgestellt.
bin jetzt bei 6058036 Bytes.
Danke!!

Manchmal muss man dem Problem auch einfach Zeit geben sich selbst zu lösen :smile:

1 Like

Hi Vincent,
leider funktioniert es doch nicht richtig.
Sobald ich das Terminnal schließe, geht node red aus.
Wenn ich dann node-red-restart und node-red-log eingebe,
erscheint das.
Ich kann damit garnichts anfangen.
Hast du eine Ahnung


pi@pekaway:~ $ node-red-restart
Restarted Node-RED
pi@pekaway:~ $ node-red-log


===================
11 Oct 15:30:01 - [info] Node-RED version: v3.1.9
11 Oct 15:30:01 - [info] Node.js  version: v22.9.0
11 Oct 15:30:01 - [info] Linux 6.6.51+rpt-rpi-v8 arm64 LE
(node:2269) [DEP0059] DeprecationWarning: The `util.log API is deprecated. Please use console.log() with a custom formatter or a third-party logger instead.
(Use `node --trace-deprecation ...` to show where the warning was created)
11 Oct 15:30:02 - [info] Loading palette nodes
Stopping nodered.service - Node-RED graphical event wiring tool...
11 Oct 15:30:04 - [info] Worldmap version 4.8.0
11 Oct 15:30:05 - [info] Dashboard version 3.6.5 started at /ui
(node:2269) [DEP0060] DeprecationWarning: The `util._extend` API is deprecated. Please use Object.assign() instead.
(node:2269) [DEP0040] DeprecationWarning: The `punycode` module is deprecated. Please use a userland alternative instead.
nodered.service: Deactivated successfully.
Stopped nodered.service - Node-RED graphical event wiring tool.
nodered.service: Consumed 6.109s CPU time.
Started nodered.service - Node-RED graphical event wiring tool.
11 Oct 15:31:02 - [info]
Welcome to Node-RED
===================
11 Oct 15:31:02 - [info] Node-RED version: v3.1.9
11 Oct 15:31:02 - [info] Node.js  version: v22.9.0
11 Oct 15:31:02 - [info] Linux 6.6.51+rpt-rpi-v8 arm64 LE
(node:2321) [DEP0059] DeprecationWarning: The `util.log API is deprecated. Please use console.log() with a custom formatter or a third-party logger instead.
(Use `node --trace-deprecation ...` to show where the warning was created)
11 Oct 15:31:03 - [info] Loading palette nodes
11 Oct 15:31:05 - [info] Worldmap version 4.8.0
11 Oct 15:31:06 - [info] Dashboard version 3.6.5 started at /ui
(node:2321) [DEP0060] DeprecationWarning: The `util._extend` API is deprecated. Please use Object.assign() instead.
(node:2321) [DEP0040] DeprecationWarning: The `punycode` module is deprecated. Please use a userland alternative instead.
11 Oct 15:31:06 - [info] Settings file  : /home/pi/.node-red/settings.js
11 Oct 15:31:06 - [info] Context store  : 'default' [module=memory]
11 Oct 15:31:06 - [info] User directory : /home/pi/.node-red
11 Oct 15:31:06 - [warn] Projects disabled : editorTheme.projects.enabled=false
11 Oct 15:31:06 - [info] Flows file     : /home/pi/.node-red/flows_pekaway.json
11 Oct 15:31:06 - [info] Server now running at http://127.0.0.1:1880/
11 Oct 15:31:07 - [warn]
---------------------------------------------------------------------
Your flow credentials file is encrypted using a system-generated key.
If the system-generated key is lost for any reason, your credentials
file will not be recoverable, you will have to delete it and re-enter
your credentials.
You should set your own key using the 'credentialSecret' option in
your settings file. Node-RED will then re-encrypt your credentials
file using your chosen key the next time you deploy a change.
---------------------------------------------------------------------
11 Oct 15:31:11 - [info] Starting flows
11 Oct 15:31:11 - [error] [mcp23017chip:4e9949f3b6e19991] Error: EIO, Input/output error
  MCP/FCP context does not exists yet. Creating now: i2c1RW
  MCP/PCF chip initialization OK. BusNumber=1 Address=112  id:4dcf133584c2cb20
  MCP/FCP context does exists already: i2c1RW
  MCP/PCF chip initialization OK. BusNumber=1 Address=120  id:e93ccc14627f9596
11 Oct 15:31:14 - [info] [ui_worldmap:worldmap] started at /map
---
>>> Initializing PCF8574 or MPC23017 Input node >>  bitNum=1  pullUp=false  invert=true  id=e94a13306b079986
  MCP/PCF init-Bit started... Addr=120  bitNum=1  isInput=true  pullUp=false  startAllHigh=false  LastState=-2
OK. MCP/PCF Bit-initialization finished. Bus closed.
  ...state update >>  _onOffState: 1   globalState= 1  Node_id=e94a13306b079986
  MCP/PCF startChipTimer = 0100 ms
  MCP/PCF Starting Timer now...
---
>>> Initializing PCF8574 or MPC23017 Input node >>  bitNum=2  pullUp=false  invert=true  id=758d34b1a094d51f
  MCP/PCF init-Bit started... Addr=120  bitNum=2  isInput=true  pullUp=false  startAllHigh=false  LastState=-2
OK. MCP/PCF Bit-initialization finished. Bus closed.
  ...state update >>  _onOffState: 1   globalState= 1  Node_id=758d34b1a094d51f
  MCP/PCF startChipTimer = 0100 ms
  MCP/PCF Timer is already running
  MCP/PCF This timer interval is already set. There is nothing to do.
---
>>> Initializing PCF8574 or MPC23017 Input node >>  bitNum=4  pullUp=false  invert=true  id=16bef34f3c7b9c9d
  MCP/PCF init-Bit started... Addr=120  bitNum=4  isInput=true  pullUp=false  startAllHigh=false  LastState=-2
OK. MCP/PCF Bit-initialization finished. Bus closed.
  ...state update >>  _onOffState: 1   globalState= 1  Node_id=16bef34f3c7b9c9d
  MCP/PCF startChipTimer = 0100 ms
  MCP/PCF Timer is already running
  MCP/PCF This timer interval is already set. There is nothing to do.
---
>>> Initializing PCF8574 or MPC23017 Input node >>  bitNum=5  pullUp=false  invert=true  id=19eebad08b442d7e
  MCP/PCF init-Bit started... Addr=120  bitNum=5  isInput=true  pullUp=false  startAllHigh=false  LastState=-2
OK. MCP/PCF Bit-initialization finished. Bus closed.
  ...state update >>  _onOffState: 1   globalState= 1  Node_id=19eebad08b442d7e
  MCP/PCF startChipTimer = 0100 ms
  MCP/PCF Timer is already running
  MCP/PCF This timer interval is already set. There is nothing to do.
---
>>> Initializing PCF8574 or MPC23017 Input node >>  bitNum=6  pullUp=false  invert=true  id=931724c0b9c622a3
  MCP/PCF init-Bit started... Addr=120  bitNum=6  isInput=true  pullUp=false  startAllHigh=false  LastState=-2
OK. MCP/PCF Bit-initialization finished. Bus closed.
  ...state update >>  _onOffState: 1   globalState= 1  Node_id=931724c0b9c622a3
  MCP/PCF startChipTimer = 0100 ms
  MCP/PCF Timer is already running
  MCP/PCF This timer interval is already set. There is nothing to do.
---
>>> Initializing PCF8574 or MPC23017 Input node >>  bitNum=7  pullUp=false  invert=true  id=7e9465438e4a6d14
  MCP/PCF init-Bit started... Addr=120  bitNum=7  isInput=true  pullUp=false  startAllHigh=false  LastState=-2
OK. MCP/PCF Bit-initialization finished. Bus closed.
  ...state update >>  _onOffState: 1   globalState= 1  Node_id=7e9465438e4a6d14
  MCP/PCF startChipTimer = 0100 ms
  MCP/PCF Timer is already running
  MCP/PCF This timer interval is already set. There is nothing to do.
---
>>> Initializing PCF8574 or MPC23017 Input node >>  bitNum=0  pullUp=false  invert=true  id=64c0d82b1385ec8c
  MCP/PCF init-Bit started... Addr=120  bitNum=0  isInput=true  pullUp=false  startAllHigh=false  LastState=-2
OK. MCP/PCF Bit-initialization finished. Bus closed.
  ...state update >>  _onOffState: 1   globalState= 1  Node_id=64c0d82b1385ec8c
  MCP/PCF startChipTimer = 0100 ms
  MCP/PCF Timer is already running
  MCP/PCF This timer interval is already set. There is nothing to do.
---
>>> Initializing PCF8574 or MPC23017 Input node >>  bitNum=3  pullUp=false  invert=true  id=7cb98ea85dad7cc1
  MCP/PCF init-Bit started... Addr=120  bitNum=3  isInput=true  pullUp=false  startAllHigh=false  LastState=-2
OK. MCP/PCF Bit-initialization finished. Bus closed.
  ...state update >>  _onOffState: 1   globalState= 1  Node_id=7cb98ea85dad7cc1
  MCP/PCF startChipTimer = 0100 ms
  MCP/PCF Timer is already running
  MCP/PCF This timer interval is already set. There is nothing to do.
11 Oct 15:31:20 - [info] [Bme280:BME 280] Initializing on bus1 addr:118
11 Oct 15:31:20 - [info] [Bme280:BMP 280] Initializing on bus1 addr:119
<--- Last few GCs --->
[2321:0x7fb0510000]    22132 ms: Mark-Compact 494.4 (528.8) -> 494.0 (528.8) MB, pooled: 0 MB, 659.93 / 0.00 ms  (average mu = 0.165, current mu = 0.040) allocation failure; GC in old space requested
[2321:0x7fb0510000]    22833 ms: Mark-Compact 494.2 (528.8) -> 494.0 (529.0) MB, pooled: 0 MB, 557.16 / 0.00 ms  (average mu = 0.185, current mu = 0.205) allocation failure; GC in old space requested
<--- JS stacktrace --->
FATAL ERROR: Reached heap limit Allocation failed - JavaScript heap out of memory
----- Native stack trace -----
 1: 0xe04ce4 node::OOMErrorHandler(char const*, v8::OOMDetails const&) [node-red]
 2: 0x11e4a4c v8::Utils::ReportOOMFailure(v8::internal::Isolate*, char const*, v8::OOMDetails const&) [node-red]
 3: 0x11e4bfc v8::internal::V8::FatalProcessOutOfMemory(v8::internal::Isolate*, char const*, v8::OOMDetails const&) [node-red]
 4: 0x140953c  [node-red]
 5: 0x14214a0 v8::internal::Heap::CollectGarbage(v8::internal::AllocationSpace, v8::internal::GarbageCollectionReason, v8::GCCallbackFlags) [node-red]
 6: 0x13f7dd8 v8::internal::HeapAllocator::AllocateRawWithLightRetrySlowPath(int, v8::internal::AllocationType, v8::internal::AllocationOrigin, v8::internal::AllocationAlignment) [node-red]
 7: 0x13f8c10 v8::internal::HeapAllocator::AllocateRawWithRetryOrFailSlowPath(int, v8::internal::AllocationType, v8::internal::AllocationOrigin, v8::internal::AllocationAlignment) [node-red]
 8: 0x18274d4 v8::internal::Deserializer<v8::internal::Isolate>::Allocate(v8::internal::AllocationType, int, v8::internal::AllocationAlignment) [node-red]
 9: 0x182ab8c v8::internal::Deserializer<v8::internal::Isolate>::ReadObject(v8::internal::SnapshotSpace) [node-red]
10: 0x1829cbc int v8::internal::Deserializer<v8::internal::Isolate>::ReadSingleBytecodeData<v8::internal::SlotAccessorForHeapObject>(unsigned char, v8::internal::SlotAccessorForHeapObject) [node-red]
11: 0x182a97c v8::internal::Deserializer<v8::internal::Isolate>::ReadData(v8::internal::Handle<v8::internal::HeapObject>, int, int) [node-red]
12: 0x182ac44 v8::internal::Deserializer<v8::internal::Isolate>::ReadObject(v8::internal::SnapshotSpace) [node-red]
13: 0x182af7c int v8::internal::Deserializer<v8::internal::Isolate>::ReadSingleBytecodeData<v8::internal::SlotAccessorForHandle<v8::internal::Isolate> >(unsigned char, v8::internal::SlotAccessorForHandle<v8::internal::Isolate>) [node-red]
14: 0x182b7ac v8::internal::Deserializer<v8::internal::Isolate>::ReadObject() [node-red]
15: 0x182ab54 v8::internal::Deserializer<v8::internal::Isolate>::ReadObject(v8::internal::SnapshotSpace) [node-red]
16: 0x1829cbc int v8::internal::Deserializer<v8::internal::Isolate>::ReadSingleBytecodeData<v8::internal::SlotAccessorForHeapObject>(unsigned char, v8::internal::SlotAccessorForHeapObject) [node-red]
17: 0x182a97c v8::internal::Deserializer<v8::internal::Isolate>::ReadData(v8::internal::Handle<v8::internal::HeapObject>, int, int) [node-red]
18: 0x182ac44 v8::internal::Deserializer<v8::internal::Isolate>::ReadObject(v8::internal::SnapshotSpace) [node-red]
19: 0x1829cbc int v8::internal::Deserializer<v8::internal::Isolate>::ReadSingleBytecodeData<v8::internal::SlotAccessorForHeapObject>(unsigned char, v8::internal::SlotAccessorForHeapObject) [node-red]
20: 0x182a97c v8::internal::Deserializer<v8::internal::Isolate>::ReadData(v8::internal::Handle<v8::internal::HeapObject>, int, int) [node-red]
21: 0x182ac44 v8::internal::Deserializer<v8::internal::Isolate>::ReadObject(v8::internal::SnapshotSpace) [node-red]
22: 0x1829cbc int v8::internal::Deserializer<v8::internal::Isolate>::ReadSingleBytecodeData<v8::internal::SlotAccessorForHeapObject>(unsigned char, v8::internal::SlotAccessorForHeapObject) [node-red]
23: 0x182a97c v8::internal::Deserializer<v8::internal::Isolate>::ReadData(v8::internal::Handle<v8::internal::HeapObject>, int, int) [node-red]
24: 0x182ac44 v8::internal::Deserializer<v8::internal::Isolate>::ReadObject(v8::internal::SnapshotSpace) [node-red]
25: 0x1829cbc int v8::internal::Deserializer<v8::internal::Isolate>::ReadSingleBytecodeData<v8::internal::SlotAccessorForHeapObject>(unsigned char, v8::internal::SlotAccessorForHeapObject) [node-red]
26: 0x182a97c v8::internal::Deserializer<v8::internal::Isolate>::ReadData(v8::internal::Handle<v8::internal::HeapObject>, int, int) [node-red]
27: 0x182ac44 v8::internal::Deserializer<v8::internal::Isolate>::ReadObject(v8::internal::SnapshotSpace) [node-red]
28: 0x1829cbc int v8::internal::Deserializer<v8::internal::Isolate>::ReadSingleBytecodeData<v8::internal::SlotAccessorForHeapObject>(unsigned char, v8::internal::SlotAccessorForHeapObject) [node-red]
29: 0x182a97c v8::internal::Deserializer<v8::internal::Isolate>::ReadData(v8::internal::Handle<v8::internal::HeapObject>, int, int) [node-red]
30: 0x182ac44 v8::internal::Deserializer<v8::internal::Isolate>::ReadObject(v8::internal::SnapshotSpace) [node-red]
31: 0x1829cbc int v8::internal::Deserializer<v8::internal::Isolate>::ReadSingleBytecodeData<v8::internal::SlotAccessorForHeapObject>(unsigned char, v8::internal::SlotAccessorForHeapObject) [node-red]
32: 0x182a97c v8::internal::Deserializer<v8::internal::Isolate>::ReadData(v8::internal::Handle<v8::internal::HeapObject>, int, int) [node-red]
33: 0x182ac44 v8::internal::Deserializer<v8::internal::Isolate>::ReadObject(v8::internal::SnapshotSpace) [node-red]
34: 0x182af7c int v8::internal::Deserializer<v8::internal::Isolate>::ReadSingleBytecodeData<v8::internal::SlotAccessorForHandle<v8::internal::Isolate> >(unsigned char, v8::internal::SlotAccessorForHandle<v8::internal::Isolate>) [node-red]
35: 0x182b7ac v8::internal::Deserializer<v8::internal::Isolate>::ReadObject() [node-red]
36: 0x18242c8 v8::internal::ContextDeserializer::Deserialize(v8::internal::Isolate*, v8::internal::Handle<v8::internal::JSGlobalProxy>, v8::internal::DeserializeEmbedderFieldsCallback) [node-red]
37: 0x18244a0 v8::internal::ContextDeserializer::DeserializeContext(v8::internal::Isolate*, v8::internal::SnapshotData const*, unsigned long, bool, v8::internal::Handle<v8::internal::JSGlobalProxy>, v8::internal::DeserializeEmbedderFieldsCallback) [node-red]
38: 0x183f4d8 v8::internal::Snapshot::NewContextFromSnapshot(v8::internal::Isolate*, v8::internal::Handle<v8::internal::JSGlobalProxy>, unsigned long, v8::internal::DeserializeEmbedderFieldsCallback) [node-red]
39: 0x14ddde4 v8::internal::Genesis::Genesis(v8::internal::Isolate*, v8::internal::MaybeHandle<v8::internal::JSGlobalProxy>, v8::Local<v8::ObjectTemplate>, unsigned long, v8::internal::DeserializeEmbedderFieldsCallback, v8::MicrotaskQueue*) [node-red]
40: 0x14df1b8 v8::internal::Bootstrapper::CreateEnvironment(v8::internal::MaybeHandle<v8::internal::JSGlobalProxy>, v8::Local<v8::ObjectTemplate>, v8::ExtensionConfiguration*, unsigned long, v8::internal::DeserializeEmbedderFieldsCallback, v8::MicrotaskQueue*) [node-red]
41: 0x11e48e8  [node-red]
42: 0x11fe998 v8::NewContext(v8::Isolate*, v8::ExtensionConfiguration*, v8::MaybeLocal<v8::ObjectTemplate>, v8::MaybeLocal<v8::Value>, unsigned long, v8::internal::DeserializeEmbedderFieldsCallback, v8::MicrotaskQueue*) [node-red]
43: 0x11fec88 v8::Context::FromSnapshot(v8::Isolate*, unsigned long, v8::DeserializeInternalFieldsCallback, v8::ExtensionConfiguration*, v8::MaybeLocal<v8::Value>, v8::MicrotaskQueue*, v8::DeserializeContextDataCallback) [node-red]
44: 0xf30c50 node::contextify::ContextifyContext::CreateV8Context(v8::Isolate*, v8::Local<v8::ObjectTemplate>, node::SnapshotData const*, v8::MicrotaskQueue*) [node-red]
45: 0xf32b0c node::contextify::ContextifyContext::New(node::Environment*, v8::Local<v8::Object>, node::contextify::ContextOptions*) [node-red]
46: 0xf32eb8 node::contextify::ContextifyContext::MakeContext(v8::FunctionCallbackInfo<v8::Value> const&) [node-red]
47: 0x1c67f98  [node-red]
nodered.service: Main process exited, code=killed, status=6/ABRT
nodered.service: Failed with result 'signal'.
nodered.service: Consumed 47.562s CPU time.
nodered.service: Scheduled restart job, restart counter is at 1.
Stopped nodered.service - Node-RED graphical event wiring tool.
nodered.service: Consumed 47.562s CPU time.
Started nodered.service - Node-RED graphical event wiring tool.
11 Oct 15:31:46 - [info]
Welcome to Node-RED

[2321:0x7fb0510000]    22132 ms: Mark-Compact 494.4 (528.8) -> 494.0 (528.8) MB, pooled: 0 MB, 659.93 / 0.00 ms  (average mu = 0.165, current mu = 0.040) allocation failure; GC in old space requested
[2321:0x7fb0510000]    22833 ms: Mark-Compact 494.2 (528.8) -> 494.0 (529.0) MB, pooled: 0 MB, 557.16 / 0.00 ms  (average mu = 0.185, current mu = 0.205) allocation failure; GC in old space requested
<--- JS stacktrace --->
FATAL ERROR: Reached heap limit Allocation failed - JavaScript heap out of memory

Da ist der Fehler, da sehen wir dass der Garbage Collector nicht wirklich Speicher freiräumen konnte. Ich denke das kommt durch die große json Datei. Du kannst den zugewiesenen Speicher folgendermaßen vergrößern

sudo nano /etc/systemd/system/multi-user.target.wants/nodered.service

Dort gibt es eine Zeile mit Environment="NODE_OPTIONS=--max_old_space_size=512

Das kannst du einfach erhöhen, je nachdem wieviel Arbeitsspeicher dein RPI hat. Aber nicht alles zuweisen, bisschen Reserve sollte immer da sein für andere Prozesse.
Dann noch neustarten:

sudo systemctl daemon-reload
sudo systemctl restart nodered.service


Sobald ich das Terminnal schließe, geht node red aus.
Wenn ich dann node-red-restart

Du musst unterscheiden zwischen einem manuellen Start im Terminal und einem Systemdienst. Wenn du eine Anwendung manuell startest, dann wird sie wieder geschlossen sobald du das Terminal schließt, weil die Anwendung dann terminalgebunden ist. Über einen Systemdienst können Anwendungen im Hintergrund laufen und das System sorgt dafür, dass bei Fehlern und Neustarts etc. die Anwendung wieder gestartet wird.
Deswegen benutzen wir den Systemdienst, den wir mit sudo systemctl steuern.

Hi Vincent
ich habe den Wert mal verdoppelt
#Environment="NODE_OPTIONS=--max_old_space_size=512
Environment="NODE_OPTIONS=--max_old_space_size=1024
bei 4 Gig, sollte das ja noch genügend restspeicher sein.
und jetzt läuft es :slight_smile:
Dann kann ich, weiter aufräumen, und schauen was ich von deiner DS18b20 Steuerung für meine Dimmer Temperaturen brauchen kann :joy:
schönes WE
Gruß Arno

Heißt das das im November die Truma Heizung kommt ?
Gruß, Stefan

Wir warten mal gespannt ab :wink:

Ich warte mit, ich muss mich demnächst auch damit rumschlagen. Spätestens im Februar. Ich bin halt noch am überlegen ob direkt auf den Raspi, (ich hab den Display port wieder frei, gps kommt jetzt über rut955) oder über den Umweg esp32.

@Vincent Es wäre schön, wenn ihr uns hier mehr Info zu geben könntet.
Denn ich habe nun alles neu gemacht und ein neues, frisches Image aufgespielt.
Ich muss wissen, ob ich noch den November abwarte, oder selber etwas stricken muss, wenn es bei euch nicht absehbar ist.
Vielen Dank, Stefan

@ Hallo Vinzent
Servus Zusammen,
Ich habe gerade das neue Update 2.02 auf den Core gespielt jetzt funktionieren die input schalter nicht mehr richtig ich kann darüber nur noch dss jeweilige licht ausschalten aber nicht mehr ein?
Bräuchte da bitte eure Unterstützung.
Gruß Markus

Hallo Markus
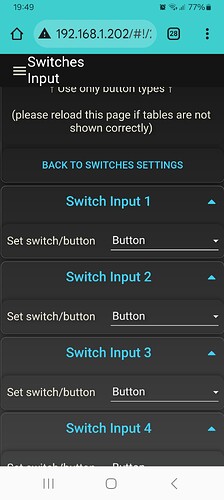
Kann es sein das du die Schalter nicht konfiguriert hast


Hier kannst du einstellen auf Taster oder Schalter

Servus das habe ich schon kontrolliert nach dem update passte alles.
konnte nach dem update die lichter garnicht mehr ausschalten an denen die input schalter hängen alles probiert half nur noch ein neustart dann konnte ich sie ausschalten aber nicht mehr an
Gruß Markus

Hey @Markus1,

Hab den Fehler gefunden, das ganze passiert nur wenn die Schalter auf Switch stehen im Zusammenhang mit den Dimmern. Folgende Änderungen sind von Nöten:

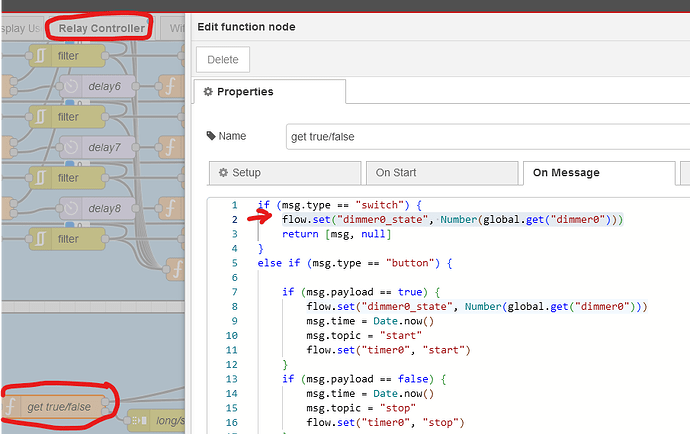
Im Flow Relay Controller in den function Nodes "get true/false (bei den short/long pushes) muss hier folgende zweite Zeile ergänzt werden:

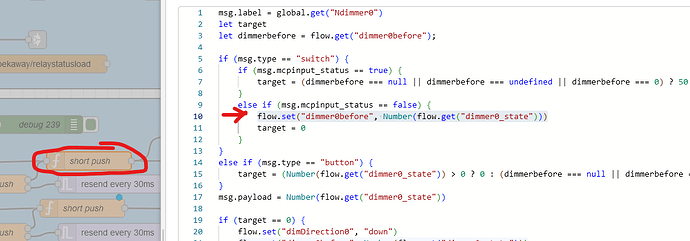
und dann dahinter, in der fucntion Node “short push” kommt Zeile 10 neu dazu.

Dann sollte das wieder funktionieren.

1 Like

Soll kommen, aber solange es nicht zufriedenstellend läuft kann ich nichts versprechen.

:slight_smile: Vincent ja OK, danke für die Info. Aber du bekommst das bestimmt hin…:slight_smile:

@Hallo Vincent,
Habs geändert so wie du es gesagt hast, leider ändert sich nichts kann immer nur noch abschalten aber nicht wieder ein.
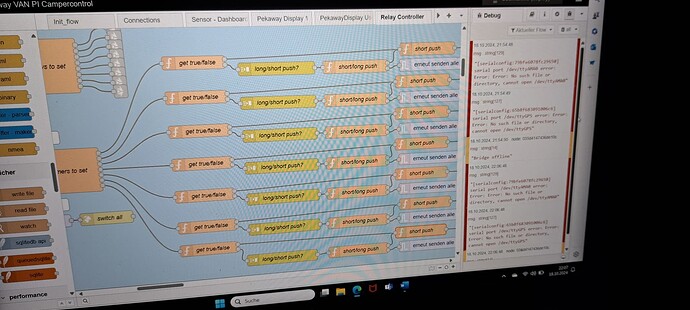
Es gab dann einige Fehler im Debug


Siehe Foto die habe ich dsnn gelöscht und das system neu gestartet weiterhin ohne Erfolg
Gruß Markus

Wenn ich den HAT verwende … Muss ich da überhaupt was machen oder auch auf das relayboard in der config umstellen ?